Categories

Boosting Product Quality: How can visual inspection improve quality control in manufacturing?

Whether companies are making cars, semiconductor chips, smartphones, or food, having high-quality standards is essential for their business success. This is where quality control plays a major role in many industries. Ineffective quality control can lead to major operational and financial consequences, including rework, excess waste, lower output, elevated work-in-process inventory, post-sale recalls, warranty claims, and repairs.

The same applies to the manufacturing industry. By implementing effective quality control measures, manufacturers can ensure that their products are safe, reliable, and of the highest quality.

Visual inspection plays a key role in quality control, enabling manufacturers to ensure products meet industry standards and customer expectations. Here are the important aspects of quality control checks through visual inspection:

  • Incoming Material Inspection: Visually inspect raw materials and components as they arrive to identify any initial defects such as discoloration, damage, or imperfections.
  • In-Process Inspection: Conduct inspections during various production stages to catch defects early, such as examining alignment, surface finish, and correct part placement.
  • Final Product Inspection: At the end of the production line, inspect finished products for cosmetic appearance, functional aspects, and labeling accuracy.
  • Spot Checks and Sampling: Perform spot checks or sampling throughout production to monitor quality trends and address emerging issues.

Visual inspection is a cornerstone of quality control in the manufacturing industry, enhancing product quality and ensuring customer satisfaction. By incorporating thorough visual inspection at every stage of production, from incoming material inspection to final product inspection, manufacturers can boost manufacturing efficiency and detect defects early. This proactive approach to quality control helps maintain high standards, protect brand reputation, and minimize costly mistakes such as product recalls and warranty claims.

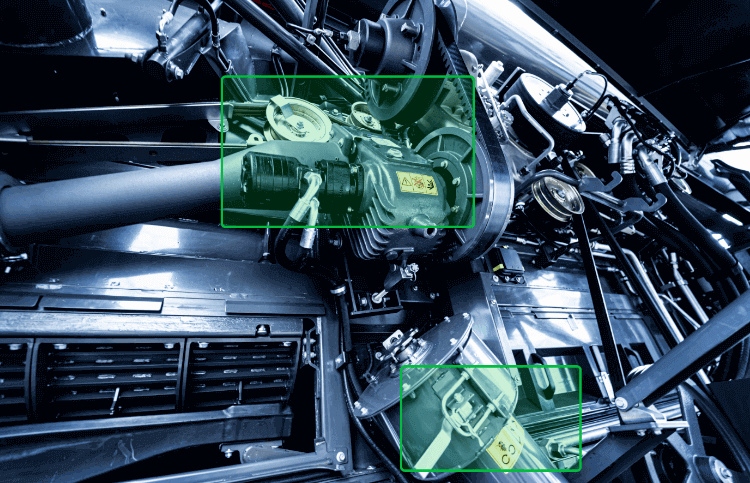
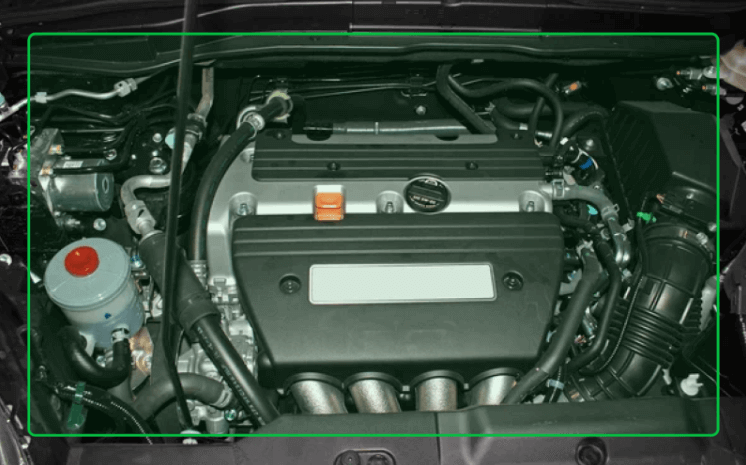
In the automotive manufacturing industry, visual inspection plays a crucial role in ensuring the quality of finished vehicles. For example, during the final assembly phase of a car, visual inspection is conducted on the vehicle’s interior and exterior. Inspectors closely examine the paint job to check for any streaks, drips, or uneven coloring. They also inspect the fit and finish of components such as doors, windows, and trims to ensure perfect alignment and smooth operation. Inside the vehicle, inspectors assess the condition of seats and upholstery for signs of damage or defects, as well as the proper installation and functionality of electronic systems like infotainment displays and controls.

AI Visual Inspection Solutions

This thorough visual inspection process ensures that every car leaving the assembly line meets the brand’s quality standards and customer expectations, minimizing the risk of returns or complaints. Through continuous improvement and adaptation of advanced inspection technologies, manufacturers can stay competitive and excel in their respective industries.

The future of quality control in manufacturing lies in the integration of Artificial Intelligence (AI) and Machine Learning (ML) technologies into visual inspection processes. AI and ML algorithms analyze vast visual data rapidly and accurately, detecting even subtle defects missed by human inspectors. Continuously learning from new data, these systems adapt and improve over time, enhancing product quality and reducing error rates. Predictive analytics powered by AI can forecast defects before they occur, enabling proactive measures to prevent production issues. Through this synergy, manufacturers can achieve greater precision, efficiency, and customer satisfaction.
Categories

Accelerating Defect Detection with AI Visual Inspection in Automotive Industry

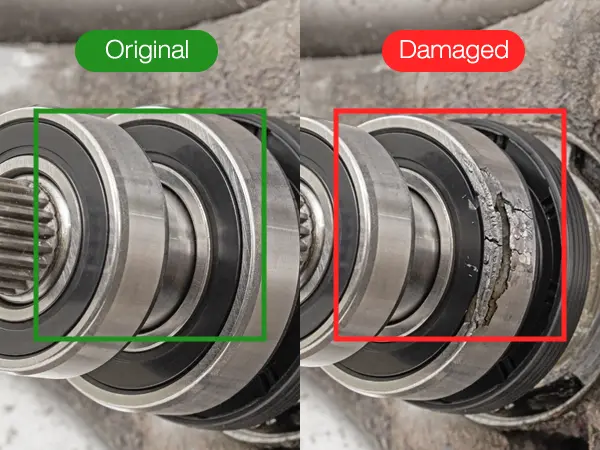
Defect detection is a critical aspect of automotive manufacturing, ensuring that vehicles meet high standards before they reach the hands of consumers. It involves identifying and improving the defects or abnormalities in various components and systems throughout the production process. Traditionally, defect detection is done through manual inspections, which are time-consuming and prone to human error. However, with the emergence of AI, now the automotive industry is experiencing a change in handling defect identification and resolving.

The automotive industry operates in a highly competitive environment where quality, efficiency, and safety are foremost aspects to look through. The need for AI visual inspection in defect detection within the automotive industry is driven by the challenges faced by the traditional inspection methods. These include susceptibility to human error, inefficiency in meeting rapid production demands, difficulty in detecting subtle defects within complex automotive components, inconsistencies in inspection quality, high resource and labor costs, and the imperative of ensuring safety and compliance.

Visual inspection AI addresses the needs of the automotive industry by providing a more efficient, rate, and consistent method of defect detection. Through advanced machine learning algorithms, visual inspection AI analyzes vast amounts of visual data in real-time, identifying defects with unprecedented speed and precision. It finds applications across various stages of automotive production, spanning from body assembly to final quality assurance. Some key areas where this technology is particularly beneficial include:

  • Body Panel Manufacturing: Detecting defects such as dents, scratches, and paint imperfections on body panels ensures that vehicles have a flawless exterior finish.
  • Welding and Assembly: Identifying welding defects, misalignments, or missing components during assembly is crucial for ensuring structural integrity and safety.
  • Electrical Component Testing: Detecting faults in circuit boards, wiring harnesses, and electronic components helps prevent malfunctions and ensures the reliability of vehicle electrical systems.
  • Interior Trim Inspection: Ensuring the quality of interior components such as upholstery, dashboard panels, and trim pieces enhances the overall comfort and aesthetics of vehicles.

The benefits of utilizing AI visual inspection in the automotive industry are vast and have important implications. To illustrate this let’s consider an example of a major car manufacturer that has implemented AI-powered cameras in their paint shop to inspect newly painted body panels. This has resulted in a significant decrease in inspection time and an increase in defect detection rates. By reducing the need for manual labor and streamlining the inspection process, the company has realized cost savings associated with labor expenses and increased production efficiency.

AI Visual Inspection Solutions

Overall, AI Visual Inspection is a game-changer for the automotive industry, offering unprecedented levels of efficiency, accuracy, and reliability in defect detection. By embracing this transformative technology, automakers can enhance their competitiveness, optimize production processes, and deliver vehicles that exceed customer expectations in terms of quality and performance.

Categories

AI Visual Inspection for Defect Identification on conveyor belt

Many recurring activities are being solved by AI-visual inspection and image processing. Particularly useful is this new technology for the manufacturing sector. There are several laborious operations in the manufacturing unit for processing, sorting, and grading materials. Your comprehension of the advantages of automation will be deeper. However, because of sensory limitations, the automatic systems haven’t been implemented correctly. As computer technology progresses through the application of machine learning and artificial intelligence, this situation is beginning to change. Let’s now examine the benefits of AI image processing for creating and growing enterprises.

AI Visual Inspection for Defect Detection

Conveyor belt quality monitoring using computer vision technology is becoming more and more common in manufacturing and production facilities. This is how it operates:

Image Capture: A camera takes pictures of goods as they move along a conveyor belt. Mounting the camera on a moving platform or fixing it there will allow you to take pictures from various perspectives.

Image Processing: Computer vision algorithms are used to process the camera’s collected images. These algorithms are able to recognize irregularities and flaws in the items, such chips, cracks, or missing parts.

Classification: The products are divided into many groups according to their flaws and quality. Products that are deemed to be of sufficient quality are removed from the line, while those that do not are permitted to stay on the conveyor belt.

Sorting: Various categories can be used to classify defective products according to their nature. This enables manufacturers to find the source of the issue and implement fixes.

Reporting: To enhance production methods and lower errors going forward, data on product quality and flaws can be gathered and examined.

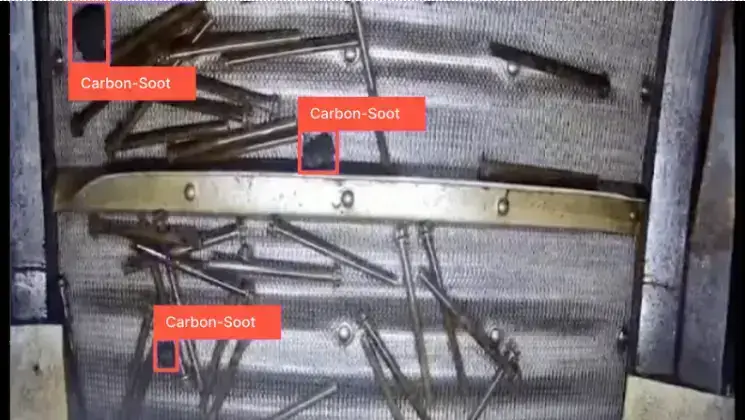
Conveyor belt computer vision identifies irregularities in quality, including color, cracks, and the direction of the moving object.

This application allows for timely quality checking of bolts on a conveyor belt by measuring the object’s length and breadth in millimeters.

AI Visual Inspection Solutions

Applications for computer vision in quality control on conveyor belts in manufacturing and industrial facilities are numerous. Here are a few particular instances:

Inspection of Product Quality: Product photos taken on a conveyor belt can be analyzed by computer vision algorithms to find flaws like chips, cracks, discolouration, or missing pieces. By doing this, it may be possible to guarantee that only top-notch goods are introduced to the market.

Label Verification: Verifying label and packaging information, including barcodes, expiration dates, and product numbers, is another application for computer vision. By doing this, you can make sure that clients receive the appropriate products in the proper packaging.

Counting and Sorting: Products on a conveyor belt can be counted and sorted using computer vision based on predetermined standards like size, shape, or color. Manufacturers may benefit from this by streamlining their processes and streamlining their supply chain.

Machine Vision Inspection: Conveyor belt machine performance can be examined with the aid of computer vision. Defects like as wear and tear, incorrect assembly, or broken parts can be recognized by the algorithms. By doing this, manufacturing efficiency may be increased and equipment problems can be avoided.

Quality Control Analytics: Data on product quality and flaws can be gathered using computer vision, and then examined to spot patterns and trends. This can assist producers in streamlining their workflow and raising the caliber of their output.

Categories

AI-Powered Vision Inspection: How AI Can Transform Your Manufacturing Process

 
Checking the quality of parts manually comes with its challenges. People can get tired and might miss mistakes when staring at numerous parts all day. Human judgment is subjective, and even the best inspectors can make errors, which can lead to bigger issues later. Imagine using faulty parts, resulting in costly re-work, product recalls, and unhappy customers. These hidden costs can seriously impact a company’s profits. For instance, think about airbags failing to deploy due to overlooked defects or a phone catching fire because of a tiny flaw – not a good scenario! Relying solely on manual inspection has its risks and can be expensive.

 
Forget about magnifying glasses and checklists; AI is revolutionizing quality control with unparalleled precision. Picture robots equipped with eagle-eyed cameras that swiftly scan parts, going beyond mere observation to truly “see” and comprehend what they’re inspecting. This AI magic can

Scan anything: From tiny screws to complex machinery, AI vision systems can handle it all.

Verify instantly: No more waiting for human inspectors. AI can quickly check if everything matches the blueprint, flagging any deviations or defects.

Detect hidden flaws: Missed cracks, misaligned parts, even tiny color variations – AI can spot them all, even faster than the human eye.

Automate like a boss: Repetitive tasks? Gone! AI handles them all, freeing up human inspectors for more complex jobs.


1. Unmatched Accuracy: Forget human error! AI inspectors are like tireless robots, catching every defect, big or small, every single time. They don’t get tired, distracted, or have bad days, ensuring consistent, top-notch quality control.

2. Boosted Efficiency: Time is money, and AI saves both. Imagine inspections happening in seconds, not hours. This frees up your team for more valuable tasks, increases production speed, and minimizes downtime due to faulty parts.

3. Real-Time Insights: AI doesn’t just see problems; it predicts them. By analyzing trends and patterns, it identifies potential issues before they occur, allowing you to take proactive measures and optimize your production process for maximum efficiency.

4. Quantifiable ROI: All these benefits translate into real, measurable results. Reduced rework, fewer recalls, and faster production mean significant cost savings. AI pays for itself, boosting your bottom line and giving you a competitive edge.

Categories

Component Number Scanning: The Missing Piece in Your Manufacturing Puzzle

 
Picture a world where production lines run smoothly, and inventory effortlessly communicates its levels as needed. Errors are like distant memories of a time long past. This optimistic vision isn’t just wishful thinking; it’s a tangible reality achievable with Scanflow’s groundbreaking Component Number Scanning feature.

For a long time, businesses have struggled with the challenges of manual data entry, a multi-headed problem filled with mistakes, inefficiencies, and an overwhelming amount of wasted time. Scanflow steps into the scene as a digital hero, brandishing its advanced scanner to combat these issues.

The magic happens when Scanflow transforms traditional paper trails into digital streams. This not only eliminates the need for tedious manual data entry but also infuses your operations with the superpowers of precision and efficiency. The newfound agility goes beyond mere data capture; it creates a seamless web of traceability. This web allows you to track each component’s journey from its creation to its final destination, ensuring flawless assembly and a finished product that deserves a round of applause.

In essence, Scanflow’s Component Number Scanning isn’t just a tool; it’s a gateway to a future where productivity soars, and inventory management becomes a melody of perfect harmony. Say goodbye to errors and welcome a streamlined, error-free era where productivity takes center stage.

 
Scanflow’s Component Number Scanning ditches the clunky pen and paper for a futuristic dance of smart devices. Picture this: a technician whips out their smartphone, scans a stencil number with a tap, and bam! The component’s identity is instantly beamed into your digital ecosystem. But Scanflow isn’t picky; it devours handwritten codes, serial numbers, even barcodes, on a smorgasbord of devices like smartphones, tablets, and even wearables, ensuring no data crumb goes unnoticed. This digital feast fuels a real-time inventory symphony, where every component sings its location and history, making your operations flow like a well-oiled machine.

 
Increased efficiency and productivity:

  • Eliminate manual data entry and reduce errors.
  • Save time and labour costs.

Enhanced traceability:

  • Trace components throughout the production cycle.
  • Facilitate recalls and optimize quality control.

Optimized inventory management:

  • Real-time inventory visibility.
  • Prevent stockouts and overstocking.

Reduced quality issues:

  • Verify component numbers early to catch errors.
  • Reduce rework and waste.

  • Manufacturing
  • Logistics
  • Field service
  • Retail
  • Healthcare
Categories

Transforming Production: How AI Eliminated Defects in Vehicle Cockpits

In the fast-paced world of manufacturing, achieving flawless production is a constant challenge. Every component matter, and even minor inconsistencies can lead to costly delays, recalls, and reputational damage. The manufacturer, precisely facing this issue, sought a revolutionary solution to ensure the highest quality standards in their intricate assembly lines.

 
The manufacturer relied on traditional manual inspection methods. This process involved human inspectors meticulously checking each individual component, switch, and button across multiple units. However, this approach suffered from several shortcomings:

  • Human error: Fatigue, individual variation, and human oversight could lead to inconsistencies and missed defects.
  • Time-consuming: Manual inspection added significant time to the production line, impacting efficiency and throughput.
  • Limited scalability: As product complexity increased with more components and variations, the manual process became cumbersome and unsustainable.

 
In a stroke of innovation, the manufacturer partnered with a tech company to develop an AI-powered switch inspection system. This cutting-edge solution leveraged:

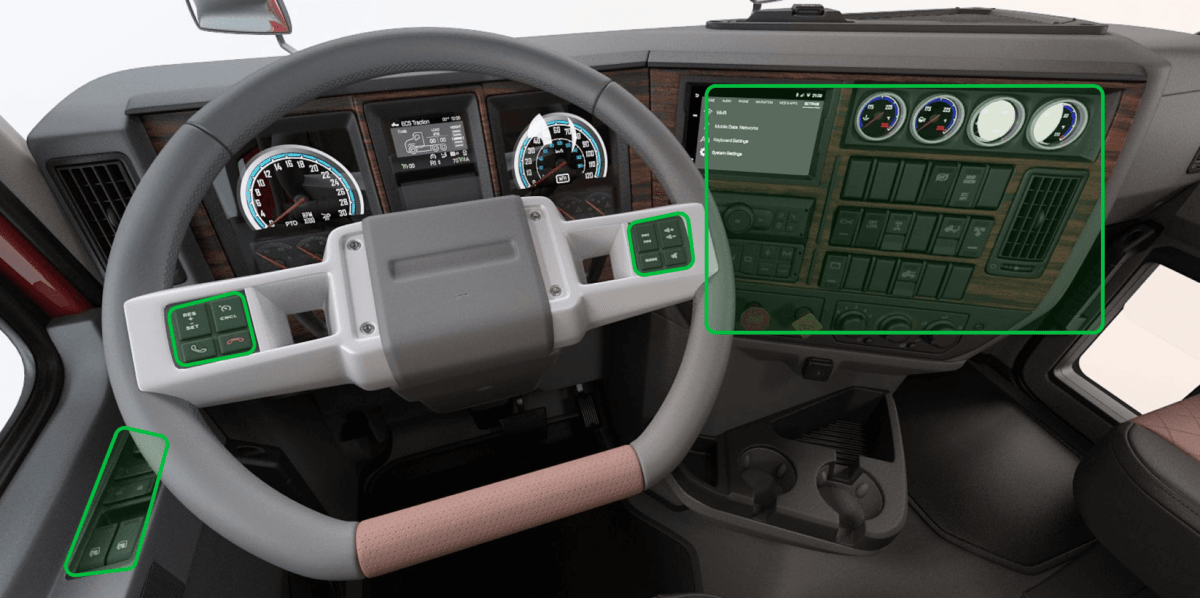
  • Sharp Vision: A trained AI model accurately identified truck models and individual switches based on scanned build cards and cockpit layouts.
  • Eagle-Eyed Inspection: The model scanned each switch within designated grids, comparing them to its database of “correct” configurations.
  • Instant Red Flags: Any deviation from the expected setup was instantly flagged, enabling immediate corrective action before defective vehicles entered production.
  • Enhanced accuracy: Eliminate human error and ensure consistent, objective quality control.
  • Increased efficiency: Automate time-consuming inspections and significantly reduce production line bottlenecks.
  • Boosted scalability: Easily adapt to different models and component variations, future-proofing quality control.
  • Cost reduction: Minimize defect rates and recalls, lowering overall production costs.

Scanflow - AI Scanner Team

Categories

Streamline Manufacturing: How Scanflow improves productivity with Component Number Scanning

In the ever-evolving world of manufacturing, where precision and efficiency reign supreme, the adoption of automation has become a beacon of hope for industries seeking to enhance workflow processes and simplify processes. Large companies, despite their resources, often encounter challenges that demand innovative solutions. One such challenge confronted by the tire & vehicle manufacturing industries is the task of extracting critical information from a diverse range of textual components.

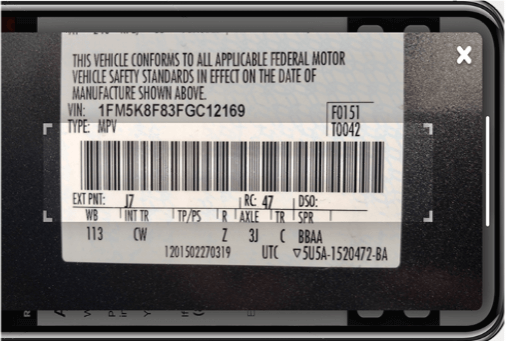
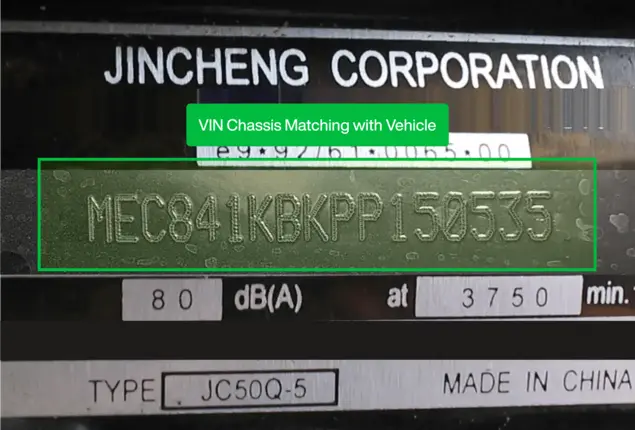
Manual data entry and verification procedures were at the heart of the manufacturing challenges faced by most industries. While these processes were undeniably crucial, they proved to be time-consuming, error-prone, and resource-intensive. The crux of the issue lay in the need to manually extract data from a variety of textual components, including Vehicle Identification Numbers (VIN), VIN Plates, Stencil numbers, handwritten codes, Serial Numbers, Tire Sidewalls, and any other component numbers, which not only did this slow down production, but it also heightened the risk of costly errors.

Scanflow helps in automating the identification of key phrases, named entities, and structured data within textual information, effectively eliminating the need for manual efforts.

Scanflow extracts accurate data, encompassing VINs, Tire Identification Numbers (TIN), and Tire Numbers, from the myriad textual components strewn across the manufacturing process. This data played a pivotal role in quality checks and production management, making its accurate extraction non-negotiable. The process had to be highly accurate and reliable, ensuring that the data captured was error-free.

Streamline Manufacturing - Component Number Scanning - ScanFlow AI Scanner

Achieving over 97% accuracy in capturing component text was a pivotal objective for Scanflow. This remarkable accuracy would significantly reduce the need for manual interventions, thus enhancing efficiency and minimizing the risk of costly errors. With such a high level of precision, the manufacturing company could trust that the data extracted by Scanflow was not only rapid but also dependable.

In an industry where downtime can have cascading effects on productivity, Scanflow also addressed the need for resilience. All captures were designed to function offline on edge devices, ensuring that the extraction process remained unaffected by connectivity issues. This robust feature was a testament to Scanflow’s commitment to keeping manufacturing processes streamlined and uninterrupted.

The implementation of Scanflow automates manual data extraction processes. The manufacturing company experienced a surge in efficiency, as workers could redirect their efforts toward more critical tasks, while Scanflow diligently handled the data extraction.

Quality checks became more precise and consistent, with errors plummeting to an all-time low. The extracted data was no longer susceptible to human oversight, ensuring the highest standards of accuracy. This newfound accuracy translated into cost savings, as errors in manufacturing were reduced greatly.

As the implementation of Scanflow showcased its effectiveness, the manufacturing company’s reputation grew stronger within the industry. This perception not only attracted more business but also opened opportunities for collaboration and innovation.

Scanflow’s journey with the tire manufacturing company exemplified how automation could revolutionize processes, enhance efficiency, and elevate the quality of products. By automating data extraction from diverse textual components, Scanflow not only addressed the specific challenges faced by the company but also unlocked a myriad of benefits that extended throughout the industry as a whole.

QR Floating