Native ANDROID SDK
- Introducing Scanflow SDK
- License Key Generation
- Native Platforms
- Barcode Scanner
- Text Scanner
- Document Scanner
- Component Scanner
- ID Scanner
- Quality Control Scanner
- Capture Guideline
Native IOS SDK
- Introducing Scanflow SDK
- License Key Generation
- Native Platforms
- Barcode Scanner
- Text Scanner
- API Reference
Xamarin Android SDK
- Introducing Scanflow SDK
- Get Started with Barcode Capture
- Debug Configurations
- Release Configurations
Xamarin IOS SDK
- Introducing Scanflow SDK
- License Key Generation
- Native Platforms
- Barcode Scanner
- Text Scanner
- API Reference
Flutter Android SDK
- Introducing Scanflow SDK
- License Key Generation
- Native Platforms
- Barcode Scanner
- Text Scanner
Flutter IOS SDK
- Introducing Scanflow SDK
- License Key Generation
- Native Platforms
- Barcode Scanner
- Text Scanner
React Native Android SDK
- Introducing Scanflow SDK
- License Key Generation
- Native Platforms
- Barcode Scanner
- Text Scanner
React Native IOS SDK
- Introducing Scanflow SDK
- License Key Generation
- Native Platforms
- Barcode Scanner
- Text Scanner
- Web SDK Document
Web SDK
- Scanflow_websdk_demo
- Scanning performance
- Usage
Maui SDK
- Add the NuGet Package
- Add Android Dependency
- Adding Camera Permission
- Adding Uncompressed Resource extension
- Initialize a handler
- Initialize Scan Activity
- Initialize Camera View in Xaml
- Create Scan Session
- Scan Types
- Register Barcode Result Events
- Start Camera
- Stop Camera
- License Retry Validation
- Customize Addon Features
- License Validation
Native IOS SDK
Xamarin Android SDK
Xamarin IOS SDK
Flutter Android SDK
Flutter IOS SDK
React Native Android SDK
React Native IOS SDK
Web SDK Document
- Native Android SDK
- Introducing Scanflow SDK
- License Key Generation
- Native Platforms
- Barcode Scanner
- Text Scanner
- Document Scanner
- Component Scanner
- ID Scanner
- Quality Control Scanner
- Capture Guideline
- Native IOS SDK
- Introducing Scanflow SDK
- License Key Generation
- Native Platforms
- Barcode Scanner
- Text Scanner
- API Reference
- Xamarin Android SDK
- Introducing Scanflow SDK
- Get Started with Barcode Capture
- Debug Configurations
- Release Configurations
- Xamarin IOS SDK
- Introducing Scanflow SDK
- License Key Generation
- Native Platforms
- Barcode Scanner
- Text Scanner
- API Reference
- Flutter Android SDK
- Introducing Scanflow SDK
- License Key Generation
- Native Platforms
- Barcode Scanner
- Text Scanner
- Maui SDK
- Flutter IOS SDK
- React Native Android SDK
- React Native IOS SDK
- Web SDK
Welcome to Scanflow SDK
Scanflow is an AI scanner on smart devices for data capture & workflow automation Kit that captures multiple data from Barcode, QR Code, Text, IDs, Safety codes
Key features:
Barcode scanning: Scanflow enables developers to quickly implement barcode / QR Code scanning into their applications running on different platforms.
Keyboard wedge: Integrate Scanflow Keyboard wedge scanner in any enterprise application and simplify workflow in industries. Instead of typing codes, one can simply touch and scan barcodes from any application.
Batch scanning: Implement Scanflow batch scanning in any smart device & capture any set of multiple code barcodes with a single scan. This highly intelligent data capture helps in transforming workflow operations with high speed and accuracy.
ID's: Capture data from any type of identity documents such as National ID cards, passports, employee IDs, and driving licenses. Transform any camera-equipped smart device into an enterprise-grade ID scanner and seamlessly automate workflow operations.
AR Measurements: With Scanflow AR measurements, scan any object to measure its dimensions without any manual meter tape. It can scan length, person height, surface plane detection, and facial attributes from any type of smart device.
Intelligent Text Scanning: Capture any form of alphanumeric text from objects, documents, or physical items. Integrate Scanflow on any smart device and capture a combination of texts and numbers.
Document Scanning: Capture any form of document and convert it into PDF. Document Scanning includes following options Document Enhancer Filter Auto,Black & White, Rotate, Reorder and Delete Document
Benefits:
- Boost your customer retention rates: Providing a seamless customer experience to your clients using a user-friendly mobile onboarding solution. This will allow you to reach out to clients through their preferred channel while still providing accurate results with few user-interface steps.
- Put yourself above the competition: Reduce the amount of work required from the end user to collect and transmit data during the onboarding process while still ensuring accurate back-end integration that processes the necessary data.
- Optimize your development resources: Integrate a ready-made, complete mobile capture solution without difficulty into your mobile application.
1. Generating a Scanflow License Key
Generating a Scanflow License - Android
- You need a license key to utilize the Scanflow SDK in your application.
- You must determine the applicationId of your Android app in order to generate a license key for your application.
- An applicationId is used to generate each license. In the event that your applicationId changes, a new license key must be generated. Please be aware that you cannot use your license key with other programmers.
In your build.gradle file
The applicationId for your app may be found in the build.gradle file of the Android Project.
Under Android > DefaultConfig > ApplicationId, it will be displayed.
In your AndroidManifest.xml
You must use the package name of your application as described in AndroidManifest.xml if the applicationId is not used in the build.gradle file.
Purchase a License Key
- Create a free test account at https://console.scanflow.ai/ if you do not already have one if you want to use Scanflow.
- Visit https://console.scanflow.ai/login to access your account.
- Click "Create native SDK licensing key" and input the bundle ID for your project if you don't yet have a license key for your app.
- The license key should be copied.
Native Platforms
Android
1. Getting Started
Add Scanflow SDK to Your APP
Prerequisites
These conditions must be satisfied in order to use the Scanflow SDK (Software Development Kit):
- OS (Operating System) supported: Android 5.0 (API Level 21) or higher.
- Supported ABIs include armeabi-v7a, arm64-v8a, x86, and x86 64.
- Android Studio 4.2 or later and Kotlin version "1.6.10" are required for development.
- An Android device with a respectable camera (recommended: 720p and above)
Add the SDK
Add the library and its components to your project in order to construct an application that uses the Scanflow Ai Capture SDK. You can add new projects or existing project bundled code examples that are ready to use right out of the box.
The Scanflow Data Capture SDK is made available via the official, open-source Maven repository.
You must always need to add a reference to ai.scanflow.datacapture:core, which contains the shared functionality used by the other data capture modules. In addition, depending on the data capture task, you will need a reference to:
- ai.scanflow.datacapture:barcode If you wish to leverage barcode-related features like 1D & 2D code capture, you need use the (ScanflowBarcodeCapture Module).
- ai.scanflow.datacapture:text If you wish to simultaneously capture text and barcodes, you can use the OCR (Optical Character Recognition) functionality of text recognition by using the (ScanflowTextCapture Module).
- ai.scanflow.datacapture:id If you wish to scan personal identity documents like an Aadhaar, a driver's license, or a PAN card, use the (ScanflowIdCapture Module).
- ai.scanflow.datacapture:document Capture any form of document and convert it into PDF. Document Scanning includes following options Document Enhancer Filter Auto, Black & White, Rotate ,Reorder and Delete Document
- ai.scanflow.datacapture:web-services If you wish to able to detect the Defective items Currently, we can detect Defect items in Switch and Sugarcane
- ai.scanflow.datacapture:component-text Capture Serial number from Components currently supported components are Leaf Suspension, Air Tank, Vin Number, Vin Plate, Vin Sticker and Universal
If you won't be using the functionality of the dependencies for barcodes, text, or IDs, you can remove them.
Gradle
1. In Project top level build.gradle Add mavenCentral() to repository in build.gradle file:
                                 repositories {
                                    maven { url "https://nexus.optisolbusiness.com/repository/scanflow-release/" }
                                 mavenCentral()
                                 }
2. Add the maven dependency to the module-level build.gradle file for each necessary features. Please, specify the library name according to your distribution version, for example:
                                 dependencies {
                                 var version = "2.0.3"
                                 api "ai.scanflow.datacapture:core:$version'
                                 api "ai.scanflow.datacapture:barcode:$version'
                                 api "ai.scanflow.datacapture:id:$version'
                                 api "ai.scanflow.datacapture:text:$version'
                                 api "ai.scanflow.datacapture:document:$version"
                                 api "ai.scanflow.datacapture:web-services:$version"
                                 api 'ai.scanflow.datacapture:component-text:1.0.1'
                                 }
The latest [version] is 2.0.3 and can be found on Sonatype.
3. In order to use UI components in your project add Kotlin std-lib dependency to the build.gradle file
                                 dependencies {
                                 implementation "org.jetbrains.kotlin:kotlin-stdlib:1.8.10"
                                 }
Note
Adding Kotlin std-lib to 'dependencies' does not add Kotlin support to your project, nor does it pose
4. Important! To acquire data on the current condition of the library, your application needs an Internet connection and Camera Permission for Scanflow AI Scanner. Add the next line to your AndroidManifest.xml file:
                                 <uses-permission android:name="android.permission.INTERNET" />
                                 <uses-permission android:name="android.permission.CAMERA" />
5. Enable Data Binding in app build.gradle add
                                 buildFeatures {
                                 dataBinding true
                                 }
Additional Information
Next steps
You are now ready to integrate the Scanflow features:
- Get Started with Barcode Scanning: provides instructions for including the barcode scanning capability in your app.
- Get Started with ID Scan: provides instructions for adding the ability to scan ID cards to your app.
- Get Started with Text Scan: provides instructions for including the text-scanning feature in your app.
2. Check our Sample & Demo Apps
Launch our Demo Apps
Start by running one of our sample apps if you want to get the most out of the Scanflow Data Capture SDK. This article will go over the various apps and explain how to use Android Studio to run them.
Samples readily available
We have developed both basic and sophisticated samples that demonstrate how to use different Scanflow Data Capture SDK functionalities. While the advanced samples demonstrate how to use more advanced settings and configure the scanner for the optimal user experience, the easy samples let you get started right away.
Here is a list of the samples we currently have for Android:
- Barcode Scan Samples
- Barcode Batch Scan Samples
- Multiple Barcode Selection Samples
- ID Card Capture Samples
- Text Data Capture Samples
You must follow a few steps before you can run a sample app:
- Create a free test account at https://console.scanflow.ai/ if you do not already have one if you want to use Scanflow.
- Visit https://console.scanflow.ai/login to access your account.
- Click "Create native SDK licensing key" and input the bundle ID for your project if you don't yet have a license key for your app.
- The license key should be copied.
Once you have it, include the license key in the example:
                                 // The Scanflow SDK license key must be entered here.
                                 // You can access your Scanflow SDK License key via your Scanflow SDK web account.
                                 val SCANFLOW_LICENSE_KEY = "-- YOUR SCANFLOW LICENSE KEY MUST BE ENTERED HERE --";
Each sample project Activity class has the SCANFLOW_LICENSE_KEY variables.
3. Release Guide
4. API Documentation
Barcode Scanner
Below you can find description of a basic Barcode capture scenario with user interface components.
1. Prerequisites
Follow these steps to include our Scanflow library code in your app module:
1. Open your build.gradle file and check that the module is now listed under dependencies if not then add this as dependency.
                                 dependencies {
                                 api 'ai.scanflow.datacapture:core:x.x.x' //2.0.3 is latest version
                                 api 'ai.scanflow.datacapture:barcode:x.x.x' //2.0.3 is latest version
                                 }
2. Click Sync Project with Gradle Files.
Runtime Permission
Add the below camera permission to your AndroidManifest.xml file
<uses-permission android:name="android.permission.CAMERA" />
2. Use SFCameraView to Visualize Scan
Before you start, add the SFCaptureView class to the XML layout of your Activity or Fragment with default parameters like below. These three view components are mandatory. SFCameraView preview is used to display the preview for camera and ViewFinderView and OverlayView are used to show bounding box once we get success result by decode process.
                              <layout xmlns: android ="http://schemas.android.com/apk/res/android"
                              xmlns: app ="http://schemas.android.com/apk/res-auto"
                              xmlns: tools ="http://schemas.android.com/tools">
                              <com.scanflow.datacapture.sfbarcode.SFCameraView
                              android  :id="@+id/scanflowView"
                              android  :layout_width="match_parent"
                              android  :layout_height="match_parent"
                              app  :bottomLeftCornerColor="@color/logo_bottom_left"
                              app  :bottomRightCornerColor="@color/logo_bottom_right"
                              app  :showPointerScanLine="true"
                              app  :roundedCorner="true"
                              app  :topLeftCornerColor="@color/logo_top_left"
                              app  :topRightCornerColor="@color/logo_top_right"
                              </layout>
3. Create the Data Capture Session
Simple Usage to integrate Scanflow SDK inside Activity or Fragment. Create SFBarcodeCaputureSession with createScanSession.You need to pass you license key for SCANFLOW_LICENSE_KEY parameter. With session object only you can be able to access SDK
                                 Val decodeConfig = DecodeConfig.ANY
                                 Val mBarcodeReader = SFBarcodeCaptureSession.createScanSession(this, SCANFLOW_LICENSE_KEY,scanflowView, decodeConfig)
                                 //We can config other properties as we required.
                                 mBarcodeReader?.setOnBarcodeScanResultCallback(this)
4. Setup Barcode Scanner Configuration
The Barcode Scanner has six different features
- QR_CODE – It allows only 2D type barcode to be scanned scanned, other types of codes will be ignored
- BARCODE - It allows only 1D type barcode to be scanned, other types of codes will be ignored
- ANY - It allows both 1D & 2D type barcode scanned
- BATCH_INVENTORY – it enables batch mode. still user reset I will save all types of 1D & 2D codes scanned by user
- ONE_OF_MANY – it enables one of many modes. Detected Code will be highlighted in overlayview user can be able to select by clicking on highlighted 1D/2D codes
- PIVOT_VIEW – Pivot view is also known for Single Hand use where among multiple 1D/2D codes on screen center of the screen will be scanned and result will be shown
This is how you can configure inside activity or Fragment
val decodeConfig = DecodeConfig.ANY //pass scan type (QR_CODE, BARCODE, ANY, BATCH_INVENTORY, ONE_OF_MANY & PIVOT_VIEW)
5. Register Barcode Result Listener
In Activity we need to extend the class with ScanflowReader.OnBarcodeScanResultCallback and initialize the SFBarcodeCaptureSession to create a session for scanning process. Based on the user selection configuration It will return ScanflowReader object.
- onScanResultSuccess returns the Barcode result object for QR Code, barcode and Any mode
- onScanResultFailure returns the Reason when Scanner failed to Scan
- onBatchScanResultSuccess returns the Batch Scan Barcode Result
- onOneOfManyCodeResult returns all barcode results in array Selected One of many codes
- onOneofManyCodeSelected returns Currently selected Result in ONE_OF_MANY Mode
- onOneofManyCodeRemoved returns Removed selected Result in ONE_OF_MANY Mode
                              class ScannerActivity : AppCompatActivity(), ScanflowReader.OnBarcodeScanResultCallback
                              mBarcodeReader?.setOnBarcodeScanResultCallback(this)
                              We can decode value result in below callback methods. It will be triggered once the input frame is processed.
                              override fun onScanResultSuccess(result: ScanResult) {
                              result.text //Barcode value
                              }
                              override fun onScanResultFailure(error: String) {}
                              override fun onBatchScanResultSuccess(result: ArrayList<ScanResultSuccess>) {
                              for (resultObj in result) {
                              resultObj.text
                              }
                              }
                              override fun onOneOfManyCodeResult(results: HashSet<OneOFManyCodesScanResults>) {
                              }
                              override fun onOneofManyCodeSelected(oneOFManyCodesScanResults: OneOFManyCodesScanResults) {
                              }
                              override fun onOneofManyCodeRemoved(oneOFManyCodesScanResults: OneOFManyCodesScanResults) {
                              }
6. Consume Build-in Camera
Override the onResume and onPause methods, embedding the UI components methods:
- Add startCamera method to the onResume method
- Add stopCamera method to the onPause method
- Add ReleaseCamera methos on the OnDestory method
                              if (PermissionUtils.checkPermission(this, Manifest.permission.CAMERA)) {
                              mBarcodeReader?.startCamera()
                              }
                              /**
                              * This method is used to Stop the camera object.
                              */
                              override fun onStop() {
                              mBarcodeReader?.stopCamera()
                              super.onStop()
                              }
                              /**
                              * This method is used to release the camera object.
                              */
                              override fun onDestroy() {
                              mBarcodeReader?.release()
                              super.onDestroy()
                              }
7. Customize Addon Features
These are some additional Addons for user customization. Users can be able to Change Beep Sound, Enable or Disable Vibration, Enable or Disable Play Beep Sound, Auto Flash Light Mode can be enabled or Disabled, Flash Light View can be modified
                                 mBarcodeReader?.setOnBarcodeScanResultCallback(this)
                                 ?.setPlayBeep(true) //enable or disable play beep sound
                                 ?.setVibrate(false) //enable or disable vibrate
                                 ?.setBeepSoundResource(R.raw.beep) //custom beep sound
                                 ?.setAutoFlashlight(autoFlashlight) //enable or disable auto flashlight mode
                                 ?.bindFlashlightView(binding.ivFlash) //Pass flashlight view id
                                 ?.setIsContinuousScan(isContinuousScan) //by default true for continuous scan
Text Scanner
Below you can find description of a basic Text capture scenario with user interface components.
1. Prerequisites
Follow these steps to include our Scanflow library code in your app module:
1. Open your build.gradle file and check that the module is now listed under dependencies if not then add this as dependency.
                                 dependencies {
                                 api 'ai.scanflow.datacapture:core:x.x.x' //2.0.3 is latest version
                                 api 'ai.scanflow.datacapture:text:x.x.x' //2.0.3 is latest version
                                 }
2. Click Sync Project with Gradle Files.
Runtime Permission
Add the below camera permission to your AndroidManifest.xml file
<uses-permission android:name="android.permission.CAMERA" />
2. Use SFCameraView to Visualize Scan
Before you start, add the SFCaptureView class to the XML layout of your Activity or Fragment with default parameters like below. These two view components are mandatory. SFCameraView preview is used to display the preview for camera and ViewFinderView to specify the area where scan performed on the desired region
                                    <layout xmlns: android ="http://schemas.android.com/apk/res/android"
                                    xmlns: app ="http://schemas.android.com/apk/res-auto"
                                    xmlns: tools ="http://schemas.android.com/tools">
                                    <com.scanflow.datacapture.sftext.SFCameraView
                                    android :id="@+id/scanflowView"
                                    android :layout_width="match_parent"
                                    android :layout_height="match_parent"
                                    app :roundedCorner="true"/>
                                    </layout>
Addons
Text capture region can be customized by adding textCaptureHeightPercentage & textCaptureWidthPercentage in SFCameraView like below
                                 app:textCaptureHeightPercentage="50"
                                 app:textCaptureWidthPercentage="50"
3. Create the Data Capture Session
Simple Usage to integrate Scanflow SDK inside Activity or Fragment. Create SFTextCaptureSession with createScanSession.You need to pass your license key for SCANFLOW_LICENSE_KEY parameter. With session object only you can be able to access SDK
                                    Val textConfig  = TextCaptureConfig.CONTAINER
                                    Val mTextReader = SFTextCaptureSession.createScanSession(this, SCANFLOW_LICENSE_KEY,scanflowView, textConfig)
                                    //We can config other properties as we required.
                                    mTextReader?. setOnTextScanResultCallback(this)
To use Text Scanning via Button Capture add below code
                                    mTextReader?.setIsContinuousScan(false)
                                    btnImageCapture.setOnClickListener {
                                    mTextReader?.captureToScan() Capture Guideline
                                    }
4. Setup Text Scanner Configuration
The Text Scanner has two different features
1. TYRE_NUMBER – It allows you to read text from Tyre. We have our own enhancement pipeline to read text from Tyre will be performed
1. TYRE_DOT – It allows you to read Tire identification number begins with the letters DOT (Department of Transportation). We have our own enhancement pipeline to read text from Tyre will be performed
2. CONTAINER_VERTICAL - It allows you to read vertical text from Containers. We have our own enhancement pipeline to read text from Containers will be performed
3. CONTAINER_HORIZONTAL - It allows you to read horizontal text from Containers. We have our own enhancement pipeline to read text from Containers will be performed
3. WHITE_COATED_TEXT - It allows you to read text from a white background. We have our own pipeline and algorithm.
This is how you can configure inside activity or Fragment
val decodeConfig = DecodeConfig. TYRE_NUMBER /pass scan type (TYRE_NUMBER, TYRE_DOT, CONTAINER_VERTICAL, CONTAINER_HORIZONTAL, WHITE_COATED_TEXT and UNIVERSAL)
5. Register Text Result Listener
In Activity we need to extend the class with ScanflowReader. setOnTextScanResultCallback and initialize the SFTextCaptureSession to create a session for scanning process. Based on the user selection configuration It will return ScanflowReader object.
onScanResultSuccess returns the TextScanResult result object for Tyre and Container
onScanResultFailure returns the Reason when Scanner failed to Scan
                                 override fun onScanResultFailure(error: String) {
                                 }
                                 override fun onScanResultSuccess(result: ScanflowReader.TextScanResult) {
                                 Log.v("TextScanResult",result.text!!)
                                 }
6. Consume Build-in Camera
Override the onResume and onPause methods, embedding the UI components methods:
- Add startCamera method to the onResume method
- Add stopCamera method to the onPause method
- Add ReleaseCamera methos on the OnDestory method
                                    if (PermissionUtils.checkPermission(this, Manifest.permission.CAMERA)) {
                                    mTextReader?.startCamera()
                                    }
                                    /**
                                    * This method is used to Stop the camera object.
                                    */
                                    override fun onStop() {
                                    mTextReader?.stopCamera()
                                    super.onStop()
                                    }
                                    /**
                                    * This method is used to release the camera object.
                                    */
                                    override fun onDestroy() {
                                    mTextReader?.release()
                                    super.onDestroy()
                                    }
7. Customize Addon Features
These are some additional Addons for user customization. Users can be able to Change Beep Sound, Enable or Disable Vibration, Enable or Disable Play Beep Sound, Auto Flash Light Mode can be enabled or Disabled, Flash Light View can be modified
                              mTextReader?. setOnTextScanResultCallback (this)
                              ?.setPlayBeep(true) //enable or disable play beep sound
                              ?.setVibrate(false) //enable or disable vibrate
                              ?.setBeepSoundResource(R.raw.beep) //custom beep sound
                              ?.setAutoFlashlight(autoFlashlight) //enable or disable auto flashlight mode
                              ?.bindFlashlightView(binding.ivFlash) //Pass flashlight view id
                              ?.setIsContinuousScan(isContinuousScan) //by default true for continuous scan
Document Scanner
Below you can find description of a basic Document capture scenario with user interface components.
1. Prerequisites
Follow these steps to include our Scanflow library code in your app module:
1. Open your build.gradle file and check that the module is now listed under dependencies if not then add this as dependency.
                                 dependencies {
                                 api 'ai.scanflow.datacapture:core:x.x.x' //2.0.0 is latest version
                                 api 'ai.scanflow.datacapture:text:x.x.x' //2.0.0 is latest version
                                 }
2. Click Sync Project with Gradle Files.
Runtime Permission
Add the below camera permission to your AndroidManifest.xml file
<uses-permission android:name="android.permission.CAMERA" />
2. Setup Document Scanner Configuration
The Document Scanner has three different features
1. CAPTURE_DOCUMENT – It allows to open scanner page directly and once successfully PDF generated its return captures pdf file path via callback to user.
2. CAPTURED_DOCUMENT_LIST - It allows you to open List of pdf files you have previously generated
3. CAPTURED_DOCUMENT_LIST_WITH_CAPTURE - It allows you to open pdf files you have previously generated with capture button to start capture new documents.
3. Create the Data Capture Session
Simple Usage to integrate Scanflow SDK inside Activity or Fragment. Create SFDocumentCaptureSession with createScanSession.You need to pass your license key for SCANFLOW_LICENSE_KEY parameter. With session object only you can be able to access SDK
                                    var sfDocumentCaptureSession = SFDocumentCaptureSession.createScanSession(this,SCANFLOW_LICENSE_KEY)
                                    sfDocumentCaptureSession.startDocumentCapture(DocumentCaptureConfig.CAPTURED_DOCUMENT_LIST_WITH_CAPTURE)
4. Register Document Result Listener
In order to obtain a Scanned Result using ScanFlow Document SDK, implement the onActivityResult callback in the activity that was used to initiate the ActivityResultLauncher. The output object will include the PDF file location.
                                    private val resultDocumentCapture: ActivityResultLauncher =
                                    registerForActivityResult(ActivityResultContracts.StartActivityForResult()) { result ->
                                    if (result.resultCode == RESULT_OK) {
                                    val pdfFilePath = result.data?.getStringExtra(Constants.PDF_FILE_PATH)
                                    pdfFilePath?.let {
                                    Log.v("pdfFilePath",it)
                                    }
                                    }
                                    }
                                    sfDocumentCaptureSession.setOnActivityResultLauncher(resultDocumentCapture)
5. Customize Addon Features
These are some additional Addons for user customization. Users can be able to Change Document Scanner Theme
In colors.xml add sfdocument_theme and replace the required colour code
<color name="sfdocument_theme">#000000</color>
Component Scanner
Below you can find description of a Serial number capture scenario with user interface for components.
1.Prerequisites
Follow these steps to include our Scanflow library code in your app module:
1. Open your build.gradle file and check that the module is now listed under dependencies if not then add this as dependency.
                                 dependencies {
                                 api 'aai.scanflow.datacapture:core:2.0.3'
                                 api 'ai.scanflow.datacapture:component-text:1.0.1'
                                 }
2. Add Maven Url in settings.gradle and Click Sync Project with Gradle Files.
                                    dependencyResolutionManagement {
                                    repositoriesMode.set(RepositoriesMode.FAIL_ON_PROJECT_REPOS)
                                    repositories {
                                    google()
                                    mavenCentral()
                                    maven { url "https://nexus.optisolbusiness.com/repository/scanflow-release/ " }
                                    }
                                    }
Runtime Permission
Add the below camera permission to your AndroidManifest.xml file
<uses-permission android:name="android.permission.CAMERA" />
2. Use SFCameraView to Visualize Scan
Before you start, add the SFCaptureView class to the XML layout of your Activity or Fragment with default parameters like below. These two view components are mandatory. SFCameraView preview is used to display the preview for camera and ViewFinderView to specify the area where scan performed on the desired region
                                 <com.scanflow.datacapture.sftext.SFCameraView
                                 android:id="@+id/scanflowView"
                                 android:layout_width="match_parent"
                                 android:layout_height="match_parent"
                                 app:roundedCorner="true"/>
Addons
capture region can be customized by adding textCaptureHeightPercentage & textCaptureWidthPercentage in SFCameraView like below
                                 app:textCaptureHeightPercentage="50"
                                 app:textCaptureWidthPercentage="50"
3. Create the Data Capture Session
Simple Usage to integrate Scanflow SDK inside Activity or Fragment. Create SFComponentTextCaptureSession with createScanSession.You need to pass your license key for SCANFLOW_LICENSE_KEY parameter. With session object only you can be able to access SDK
                                 Val componentConfig  = DaimlerTextCaptureConfig.COMPONENT_LEAFSUSPENSION
                                 ValmScanflowReader =
                                 SFComponentTextCaptureSession.createScanSession(this@MainActivity,SCANFLOW_LICENSE_KEY,scanflowView, componentConfig)
                                 mScanflowReader?.setOnTextComponentScanResultCallback(this@MainActivity)
                                 mScanflowReader?.setOnTextComponentVinPlateScanResultCallback(this@MainActivity)
                                 mScanflowReader?.setOnTextComponentVinStickerScanResultCallback(this@MainActivity)
                                 mScanflowReader?.setIsContinuousScan(false)
                                 //We can config other properties as we required.
                                 mScanflowReader?. setOnTextScanResultCallback(this)
                                 //on click capture button
                                 btnImageCapture -> {
                                 mScanflowReader?.captureToScan()
                                 }
4. Setup Text Scanner Configuration
The Text Scanner has five different features
1. COMPONENT_VINNUMBER – It allows you to read VIN from component with Silver and Black background. We have our own enhancement pipeline to read text from vin from component. Check sample dataset
2. COMPONENT_VINPLATE - It allows you to read text from Vin in Plate. We have our own enhancement pipeline to read VIN from Plate mainly Check sample dataset
3. COMPONENT_VINSTICKER - It allows you to read text from Vin in Sticker. We have our own enhancement pipeline to read VIN from Sticker mainly. Check sample dataset
4. UNIVERSAL - It allows you to read text from any components, but you may face some misleading text sometimes because we have not worked for any specific components, we highly recommended to use configuration for specific component to get high accuracy. Check sample dataset
This is how you can configure inside activity or Fragment
                                 val decodeConfig = DaimlerTextCaptureConfig. COMPONENT_LEAFSUSPENSION /pass scan type
                                 (COMPONENT_LEAFSUSPENSION, COMPONENT_AIRTANK, UNIVERSAL)
5. Register Text Result Listener
In Activity we need to extend the class with ScanflowReader. setOnTextScanResultCallback and initialize the SFTextCaptureSession to create a session for scanning process. Based on the user selection configuration It will return ScanflowReader object.
onScanResultSuccess returns the TextScanResult result object for Tyre and Container
onScanResultFailure returns the Reason when Scanner failed to Scan
                                 override fun onScanResultFailure(error: String) {
                                  }
                                 override fun onScanResultSuccess(result: ScanflowReader.TextScanResult) {
                                  Log.v("TextScanResult",result.text!!)
                                 }
6. Consume Built-in Camera
Override the onResume and onPause methods, embedding the UI components methods:
- Add startCamera method to the onResume method
- Add stopCamera method to the onPause method
- Add ReleaseCamera methos on the OnDestory method
                                    private fun startCamera() {
                                    if (mScanflowReader == null) return
                                    if (PermissionUtils.checkPermission(this,Manifest.permission.CAMERA)) {
                                    mScanflowReader?.startCamera()
                                    } else {
                                    PermissionUtils.requestPermissions(
                                    this, PERMISSIONS,
                                    CAMERA_PERMISSION_REQUEST_CODE
                                    )
                                    }
                                    }
/**
* This method is used to resume the camera object.
*/
                                    override fun onResume() {
                                    startCamera()
                                    val isTorch = mScanflowReader?.isTorchEnabled() ?: false
                                    ivFlash.isSelected = isTorch
                                    super.onResume()
                                    }
/**
* This method is used to Stop the camera object.
*/
                                    override fun onStop() {
                                    mScanflowReader?.stopCamera()
                                    super.onStop()
                                    }
/**
* This method is used to release the camera object.
*/
                                    override fun onDestroy() {
                                    mScanflowReader?.release()
                                    super.onDestroy()
                                    }
7. Customize Addon Features
These are some additional Addons for user customization. Users can be able to Change Beep Sound, Enable or Disable Vibration, Enable or Disable Play Beep Sound, Auto Flash Light Mode can be enabled or Disabled, Flash Light View can be modified
                                    mScanflowReader?. setOnTextScanResultCallback (this)
                                    ?.setPlayBeep(true) //enable or disable play beep sound
                                    ?.setVibrate(false) //enable or disable vibrate
                                    ?.setBeepSoundResource(R.raw.beep) //custom beep sound
                                    ?.setAutoFlashlight(autoFlashlight) //enable or disable auto flashlight mode
                                    ?.bindFlashlightView(binding.ivFlash) //Pass flashlight view id
                                    ?.setIsContinuousScan(isContinuousScan) //by default true for continuous scan
ID Scanner
Below you can find a description of an ID card capture scenario with user interface for components.
1.Prerequisites
Follow these steps to include our Scanflow library code in your app module:
1. Open your build.gradle file and check that the module is now listed under dependencies if not, then add this as dependency.
                              dependencies {
                              api 'ai.scanflow.datacapture:core:2.0.3'
                              api 'ai.scanflow.datacapture:id:2.0.3'
                              }
2. Add Maven URL in settings.gradle and Click Sync Project with Gradle Files.
                                 dependencyResolutionManagement {
                                 repositoriesMode.set(RepositoriesMode.FAIL_ON_PROJECT_REPOS)
                                 repositories {
                                 google()
                                 mavenCentral()
                                 maven { url "https://nexus.optisolbusiness.com/repository/scanflow-release/ " }
                                 }
                                 }
Runtime Permission
Add the below camera permission to your AndroidManifest.xml file
<uses-permission android:name="android.permission.CAMERA" />
2. Use SFCameraView to Visualize Scan
Before you start, add the SFCaptureView class to the XML layout of your Activity or Fragment with default parameters like below. These two view components are mandatory. SFCameraView preview is used to display the preview for camera and ViewFinderView to specify the area where scan performed on the desired region
                              <com.scanflow.datacapture.sfidcard.SFCameraView
                              android:id="@+id/scanflowView"
                              android:layout_width="match_parent"
                              android:layout_height="match_parent"
                              app:roundedCorner="true"/>
3. Create the Data Capture Session
Simple Usage to integrate Scanflow SDK inside Activity or Fragment. Create SFIDCardCaptureSession with createScanSession.You need to pass your license key for SCANFLOW_LICENSE_KEY parameter. With session object only you can be able to access SDK
                              Val mIdCardSession  = SFIDCardCaptureSession.createScanSession(
                              this,Constants.SCANFLOW_LICENSE_KEY, binding.scanflowView
                              )
                              mIdCardSession?.setOnIDCardScanResultCallback(resultCallback)
4. Register ID Result Listener
In Activity we need to extend the class with ScanflowReader. OnIDCardScanResultCallback and initialize the SFIDCardCaptureSession to create a session for the scanning process. Based on the user selection configuration It will return ScanflowReader object.
                              private val resultCallback = object : ScanflowReader.OnIDCardScanResultCallback {
                              override fun onScanResultSuccess(result: ScanflowReader.IDCardScanResult) {
                              Log.d(TAG, "onScanResultSuccess: ${result.toJson()}")
                              }
                              }
5. Consume Build-in Camera
Override the onResume and onPause methods, embedding the UI components methods:
- Add startCamera method to the onResume method
- Add stopCamera method to the onPause method
- Add ReleaseCamera methos on the OnDestory method
                              if (PermissionUtils.checkPermission(this, Manifest.permission.CAMERA)) {
                              mIdCardSession?.startCamera()
                               }
/**
* This method is used to Stop the camera object.
*/
                              override fun onStop() {
                              mIdCardSession?.stopCamera()
                              super.onStop()
                              }
/**
* This method is used to release the camera object.
*/
                              override fun onDestroy() {
                              mIdCardSession?.release()
                              super.onDestroy()
                              }
Quality Control Scanner
Below you can find a description of a Quality control capture scenario with user to identify defective items.
1. Prerequisites
Follow these steps to include our Scanflow library code in your app module:
1. Open your build.gradle file and check that the module is now listed under dependencies if not then add this as dependency.
                                 dependencies {
                                 api 'ai.scanflow.datacapture:core:x.x.x' //2.0.3 is latest version
                                 api 'ai.scanflow.datacapture:web-services:x.x.x' //2.0.3 is latest version
                                 }
2. Click Sync Project with Gradle Files.
Runtime Permission
Add the below camera permission to your AndroidManifest.xml file
                                 <uses-permission android:name="android.permission.CAMERA" />
                                 <uses-permission android:name="android.permission.INTERNET" />
                                 <uses-permission android:name="android.permission.ACCESS_NETWORK_STATE" />
Quality Control need both Inernet and Access_network_state permissions to access the scanflow dedicated server were the algorithm and logic are performed.
2. Use SFCameraView to Visualize Scan
Before you start, add the SFCaptureView class to the XML layout of your Activity or Fragment with default parameters like below. These two view components are mandatory. SFCameraView preview is used to display the preview for camera and ViewFinderView to specify the area where scan performed on the desired region
                                 <layout xmlns: android ="http://schemas.android.com/apk/res/android"
                                 xmlns: app ="http://schemas.android.com/apk/res-auto"
                                 xmlns: tools ="http://schemas.android.com/tools">
                                 <com.scanflow.datacapture.sfcamera.SFCameraView
                                 android:id="@+id/scanflowView"
                                 android:layout_width="match_parent"
                                 android:layout_height="match_parent"
                                 app:textCaptureHeightPercentage="80"
                                 app:textCaptureWidthPercentage="90"
                                 </layout>
Addons
capture region can be customized by adding textCaptureHeightPercentage & textCaptureWidthPercentage in SFCameraView like below
                                 app:textCaptureHeightPercentage="50"
                                 app:textCaptureWidthPercentage="50"
3. Create the Data Capture Session
Simple Usage to integrate Scanflow SDK inside Activity or Fragment. Create SFWebServiceCaptureSession with createScanSession.You need to pass your license key for SCANFLOW_LICENSE_KEY parameter. With session object only you can be able to access SDK
                                 Val config  = WebServiceCaptureConfig.SWITCH
                                 ValmScanflowReader = SFWebServiceCaptureSession.createScanSession(this, SCANFLOW_LICENSE_KEY,scanflowView, config )
                                 //We can config other properties as we required.
                                 mScanflowReader?. setOnWebServiceScanResultCallback (this)
                                 To use Scanning via Button Capture add below code
                                 mScanflowReader?.setIsContinuousScan(false)
                                 btnImageCapture.setOnClickListener {
                                 mScanflowReader?.captureToScan() Capture Guideline
                                 }
4. Setup Scanner Configuration
The Scanner has two different features
1. SUGARCANE – It allows you to detect Grade from sugarcane. We have our own enhancement pipeline to detect Grade A or B.
2. SWITCH - It allows you to detect defects from switches. We have our own enhancement pipeline to detect.
5. Register Result Listener
In Activity we need to extend the class with ScanflowReader. setOnWebServiceScanResultCallback and initialize the SFWebServiceCaptureSession to create a session for scanning process. Based on the user selection configuration It will return ScanflowReader object.
onScanResultSuccess returns the ScanResult result object for
onScanResultFailure returns the Reason when Scanner failed to Scan
                                 override fun onScanResultFailure(error: String) {
                                 Toast.makeText(
                                 this@SwitchScanActivity,
                                 "Scan Failed! Please Try again",
                                 Toast.LENGTH_LONG
                                 ).show()
                                 }
                                 override fun onScanResultSuccess(result: ScanflowReader.WebServiceScanResult) {
                                 }
6. Consume Built-in Camera
Override the onResume and onPause methods, embedding the UI components methods:
- Add startCamera method to the onResume method
- Add stopCamera method to the onPause method
- Add ReleaseCamera methos on the OnDestory method
                                    private fun startCamera() {
                                    if (mScanflowReader == null) return
                                    if (PermissionUtils.checkPermission(this,Manifest.permission.CAMERA)) {
                                    mScanflowReader?.startCamera()
                                    } else {
                                    PermissionUtils.requestPermissions(
                                    this, PERMISSIONS,
                                    CAMERA_PERMISSION_REQUEST_CODE
                                    )
                                    }
                                    }
/**
* This method is used to resume the camera object.
*/
                                    override fun onResume() {
                                    startCamera()
                                    val isTorch = mScanflowReader?.isTorchEnabled() ?: false
                                    ivFlash.isSelected = isTorch
                                    super.onResume()
                                    }
/**
* This method is used to Stop the camera object.
*/
                                    override fun onStop() {
                                    mScanflowReader?.stopCamera()
                                    super.onStop()
                                    }
/**
* This method is used to release the camera object.
*/
                                    override fun onDestroy() {
                                    mScanflowReader?.release()
                                    super.onDestroy()
                                    }
Capture Guideline
- Capture distance for better accuracy < 2 feet.
- The end object should be fitted within the camera bounding box with better closer as recommended.
- There are no other additional characters in the bound box of capture view, if possible.
- For Text scanners target region should focus on camera view and Characters should be easy to read.
- All Characters must be well defined, and no partial characters printed over the Suspension.
- Avoid very high angle capture and have contrast background.
- Capture with proper light source and ensure no glare while hovering camera view.
- Holding the phone almost identical to the surface of suspension.
- We highly recommended not to use Scanflow SDK APP when better health is less than 25% because you may face some lag in user experience.
Welcome to Scanflow SDK
Scanflow is an AI scanner on smart devices for data capture & workflow automation Kit that captures multiple data from Barcode, QR Code, Text, IDs, Safety codes
Key features:
Barcode scanning: Scanflow enables developers to quickly implement barcode / QR Code scanning into their applications running on different platforms.
Keyboard wedge: Integrate Scanflow Keyboard wedge scanner in any enterprise application and simplify workflow in industries. Instead of typing codes, one can simply touch and scan barcodes from any application.
Batch scanning: Implement Scanflow batch scanning in any smart device & capture any set of multiple code barcodes with a single scan. This highly intelligent data capture helps in transforming workflow operations with high speed and accuracy.
ID's: Capture data from any type of identity documents such as National ID cards, passports, employee IDs, and driving licenses. Transform any camera-equipped smart device into an enterprise-grade ID scanner and seamlessly automate workflow operations.
AR Measurements: With Scanflow AR measurements, scan any object to measure its dimensions without any manual meter tape. It can scan length, person height, surface plane detection, and facial attributes from any type of smart device.
Intelligent Text Scanning: Capture any form of alphanumeric text from objects, documents, or physical items. Integrate Scanflow on any smart device and capture a combination of texts and numbers.
Benefits:
- Boost your customer retention rates: Providing a seamless customer experience to your clients using a user-friendly mobile onboarding solution. This will allow you to reach out to clients through their preferred channel while still providing accurate results with few user-interface steps.
- Put yourself above the competition: Reduce the amount of work required from the end user to collect and transmit data during the onboarding process while still ensuring accurate back-end integration that processes the necessary data.
- Optimize your development resources: Integrate a ready-made, complete mobile capture solution without difficulty into your mobile application.
1. Generating a Scanflow License Key
Generating a Scanflow License - iOS
- You need a license key to utilize the Scanflow SDK in your application.
- You must determine the application bundle id of your iOS app in order to generate a license key for your application.
- An application bundle Id is used to generate each license. In case your application bundle id changes, a new license key must be generated. Please be aware that you cannot use your license key with other programmers.
In your signing and capabilities or info.plist file
The application bundle id for your app may be found in the info.plist file or in signing & capabilities
Purchase a License Key
- Create a free test account at https://console.scanflow.ai/ if you do not already have one if you want to use Scanflow.
- Visit https://console.scanflow.ai/login to access your account.
- Click "Create native SDK licensing key" and input the bundle ID for your project if you don't yet have a license key for your app.
- The license key should be copied.
iOS
1. Getting Started
Add Scanflow SDK to Your APP
Prerequisites
To be able to use the Scanflow SDK (Software Development Kit), the following requirements must be met:
- Supported OS (Operating System): iOS 13.0 or higher.
- Development Environment: XCode 13.0+ and swift version = "5.0+"
- A valid Scanflow Data Capture SDK license key. You can sign up for a free test account at https://scanflow.ai
Add the SDK
Add the library and its components to your project to construct an application that uses the Scan flow Ai Capture SDK. You can add new projects or existing project bundled code examples that are ready to use right out of the box.
ScanflowCore, ScanflowBarcode, ScanflowText SDK’s are distributed officially in cocoapods .
You must always need to add a reference to AVCaptureSession which contains the shared functionality used by the other data capture modules. In addition, depending on the data capture task, you will need a reference to:
- ScanflowCameraManager This manager functions consist of all camera related operations like permission handling and then some image enhancing process.
- ScanflowBarcodeManager, if you want use barcode related function like detecting and decoding process of barcode
- ScanflowTextManager, if you want to text recognition like OCR (Optical Character Recognition). This module consists of functionalities and process related to read text from anywhere.
Info.Plist
To acquire data on the current condition of the library, your application needs an Internet connection and Camera Permission for Scanflow AI Scanner. So confirm you have given app privacy camera usage description in your info.plist
                           Key : Privacy - Camera Usage Description
                           Value : $(PRODUCT_NAME) camera use
                           Key    :  Privacy - Location Always and When In Use Usage Description
                           Value  :  $(PRODUCT_NAME) location access
Additional Information
Next steps
You are now ready to integrate the Scanflow features:
- Get Started with Barcode Scanning: provides instructions for including the barcode scanning capability in your app.
- Get Started with ID Scan: provides instructions for adding the ability to scan ID cards to your app.
- Get Started with Text Scan: provides instructions for including the text-scanning feature in your app.
2. Check our Sample & Demo Apps
Launch our Demo Apps
Start by running one of our sample apps if you want to get the most out of the Scanflow Data Capture SDK. This article will go over the various apps and explain how to use Xcode to run them.
Samples readily available
We have developed both basic and sophisticated samples that demonstrate how to use different Scanflow Data Capture SDK functionalities. While the advanced samples demonstrate how to use more advanced settings and configure the scanner for the optimal user experience, the easy samples let you get started right away.
Here is a list of the samples we currently have for Android:
- Barcode Scan Samples
- Barcode Batch Scan Samples
- Multiple Barcode Selection Samples
- ID Card & Text Data Capture Samples
You must follow a few steps before you can run a sample app:
- Create a free test account at https://console.scanflow.ai/ if you do not already have one if you want to use Scanflow.
- Visit https://console.scanflow.ai/login to access your account.
- Click "Create native SDK licensing key" and input the bundle ID for your project if you don't yet have a license key for your app.
- The license key should be copied.
Once you have it, include the license key in the example:
                           // The Scanflow SDK license key must be entered here.
                           // You can access your Scanflow SDK License key via your Scanflow SDK web account.
                           let SCANFLOW_LICENSE_KEY = "-- YOUR SCANFLOW LICENSE KEY MUST BE ENTERED HERE --";
Each sample project Activity class has the SCANFLOW_LICENSE_KEY variables.
3. Release Guide
4. API Documentation
Barcode Scanner
Below you can find description of a basic Barcode capture scenario with user interface components.
1. Prerequisites
Pod installation
1. pod ‘ScanflowCore’
2. pod ‘ScanflowBarcode’
We must install these two pod files to integrate Barcode module.
Camera Permission
Add the below camera permission to your info.plist file
                           Key : Privacy - Camera Usage Description
                           Value : $(PRODUCT_NAME) camera use
2. Import Modules:
1. Import ScanflowCore
2. Import ScanflowBarcode
We must import those modules in code to access our barcode feature
3. Creating the instance object
                           private lazy var ScanFlowManager = ScanflowBarCodeManager (previewView: previewView,
                           scannerType: scannerType, overCropNeed: overCropNeed, overlayApperance: overlayApperance,
                           leftTopArc: UIColor, leftDownArc: UIColor, rightTopArc: UIColor, rightDownArc: UIColor,
                           needLocationAccess: Bool?)
This is ScanflowBarCodeManager initializer function that create instance for ScanflowBarCodeManager Class
Do this inside your view controller class
Parameters
- PreviewView - need to pass UIView that present in our view controller, that we want to be act as camera view
- ScannerType - Need to pass a scanner type that available in our SDK like “QR Code” or ”barcode”
- OverCropNeeded, - if cropped image is needed inside an overlay, we need to give true else need to give false
- OverlayApperance - we can be able to give rectangle overlay, square overlay or none. cropping will work on that given overlay shape
- leftTopArc - colour for left top arc of overlay
- leftDownArc - colour for left down arc of overlay
- rightTopArc - colour for right top arc of overlay
- rightDownArc - colour for right down arc of overlay
- needLocationAccess - for accessing location
4. Integrate data from framework user
public func validateLicense(authKey : String)
This is the function that give user info to our framework we must pass below params here
Parameters
- authKey - need to pass an auth key that is generated from scanflow website here
                           ScanFlowManager.validateLicense (authKey: "--------AuthKey---------")


                              Call this function in view controller viewDidLoad()
5. Start Session
                           ScanFlowManager.startSession()


                           This is the function used to start session Call this function in view controller viewDidLoad()
6. Assigning delegate to self
                           ScanFlowManager.delegate = self


                           Call this function in view controller viewDidLoad()
It asks to implement delegate functions in your view controller, so that you can able to communicate with our SDK
7. ScanflowCameraManager Delegate and its functions
Present Camera Permission Denied Alert
it would give alert if you denied camera permission, because it must need for our sdk
Present Video Configuration Alert
it would give alert if configuration of camera it is not supported, or any error occurred in camera configuration
Session Run Time Error Occured
It will trigger when session run time error occurred
session Was Interrupted (canResumeManually resumeManually: Bool)
This function called when camera session interrupted, and it gives resumeManually Boolean variable.so that we can again start camera session
Session Interuption Ended
This function called when camera session interruption ended
ShowAlert (title: String?, message: String)
This function called when camera sdk wants to show any message to user
The message title and content will be passed as params in this function. Better users use this function for log purposes
captured Output(result: String, codeType: String, results: [String]?)
This function is main output function of our SDK
it will give detected code in result variable
It will give detected code type in codeType variable
It will give detected codes in results array in case of multiple detection
captured (originalframe: CVPixelBuffer, overlayFrame: CGRect, croppedImage: UIImage)
This function is another output function of our SDK, here we can check the images captured from camera and what image will be sent to the detection as a input
it will give originalframe that is captured image in cvpixelbuffer format
It will give overlayFrame is the frame to be used for cropping the image
It will give croppedImage in UIImage format, for this you need to give crop needed option in initialize function
Text Scanner
Below you can find description of a basic Text capture scenario with user interface components.
1. Prerequisites
Pod installation
1. pod ‘ScanflowCore’
2. pod ‘ScanflowText’
We must install these two pod files to integrate Barcode module.
Camera Permission
Add the below camera permission to your info.plist file
                              Key : Privacy - Camera Usage Description


                              Value : $(PRODUCT_NAME) camera use
2. Import Modules:
1. Import ScanflowCore
2. Import ScanflowText
We must import those modules in code to access our barcode feature
3. Creating the instance object
                           private lazy var ScanFlowManager = (previewView: previewView,
                           scannerType: scannerType, overCropNeed: overCropNeed, overlayApperance: overlayApperance,
                           leftTopArc: UIColor, leftDownArc: UIColor, rightTopArc: UIColor, rightDownArc: UIColor,
                           needLocationAccess: Bool?)
This is ScanflowBarCodeManager initializer function that create instance for ScanflowBarCodeManager Class
Do this inside your view controller class
Parameters
- PreviewView - need to pass UIView that present in our view controller, that we want to be act as camera view
- ScannerType - Need to pass a scanner type that available in our SDK like “QR Code” or ”barcode” or ‘text’
- OverCropNeeded - if cropped image is needed inside an overlay, we need to give true else need to give false
- OverlayApperance – we can be able to give rectangle overlay, square overlay or none. cropping will work on that given overlay shape
- leftTopArc - colour for left top arc of overlay
- leftDownArc - colour for left down arc of overlay
- rightTopArc - colour for right top arc of overlay
- rightDownArc - colour for right down arc of overlay
- needLocationAccess - for accessing location
4. Start Session
                           ScanFlowManager.startSession()


                           This is the function used to start session Call this function in view controller viewDidLoad()
5. Assigning delegate to self
                           ScanFlowManager.delegate = self


                           Call this function in view controller viewDidLoad()
It asks to implement delegate functions in your view controller, so that you can able to communicate with our SDK
6. ScanflowCameraManager Delegate and its functions
Present Camera Permission Denied Alert
it would give alert if you denied camera permission, because it must need for our sdk
Present Video Configuration Alert
it would give alert if configuration of camera it is not supported, or any error occurred in camera configuration
Session Run Time Error Occured
It will trigger when session run time error occurred
session Was Interrupted (canResumeManually resumeManually: Bool)
This function called when camera session interrupted, and it gives resumeManually Boolean variable.so that we can again start camera session
Session Interuption Ended
This function called when camera session interruption ended
ShowAlert (title: String?, message: String)
This function called when camera sdk wants to show any message to user
The message title and content will be passed as params in this function. Better users use this function for log purposes
captured Output(result: String, codeType: String, , results: [String]?, location: CLLocation)
This function is main output function of our SDK
it will give detected code in result variable
It will give detected code type in codeType variable
It will give detected codes in results array in case of multiple detection
captured (originalframe: CVPixelBuffer, overlayFrame: CGRect, croppedImage: UIImage)
This function is another output function of our SDK, here we can check the images captured from camera and what image will be sent to the detection as a input
it will give originalframe that is captured image in cvpixelbuffer format
It will give overlayFrame is the frame to be used for cropping the image
It will give croppedImage in UIImage format, for this you need to give crop needed option in initialize function
API Reference
The Scanflow Data Capture SDK's basis for all data capture-related functionality is built on ScanflowCaptureCore. Shared classes and interfaces between the data capture modules are contained there.
Introducing Scanflow SDK
1. Requirements
To be able to use the Scanflow SDK (Software Development Kit), the following requirements must be met:
1. Development Environment: Visual Studio
2. Prerequisites
A valid Scanflow Data Capture SDK license key. You can sign up for a free test account at https://scanflow.ai/
3. Generate a Scanflow License
- If you do not have a Scanflow account yet, create a free test account at https://scanflow.ai/
- Sign into your account at https://scanflow.ai/
- If you do not have a license key for your app yet, click “Create native SDK license key” and enter the bundle ID for your project.
- Copy the license key.
- If you have a paid subscription, please reach out to support@scanflow.ai if you need a new license key.
5. Add the SDK to Your App
- Scanflow.BarcodeCapture.Xamarin.Forms is distributed officially in NuGet.org. You can download and use it directly from NuGet.Org.
Get Started with Barcode Capture:
1. Installing NuGet Package:
Follow these steps to include our Scanflow.BarcodeCapture.Xamarin.Forms NuGet Package in your app:
- Package > Right Click > Manage NuGet Packages > Browse > Scanflow.BarcodeCapture.Xamarin.Forms
- Install the latest version in Shared and Android Project.
2. Adding Android Dependency Package
In Xamarin forms Android
Package > Right Click > Manage NuGet Packages > Browse > Xamarin.AndroidX.Lifecycle.LiveData (Version - 2.6.2.1)
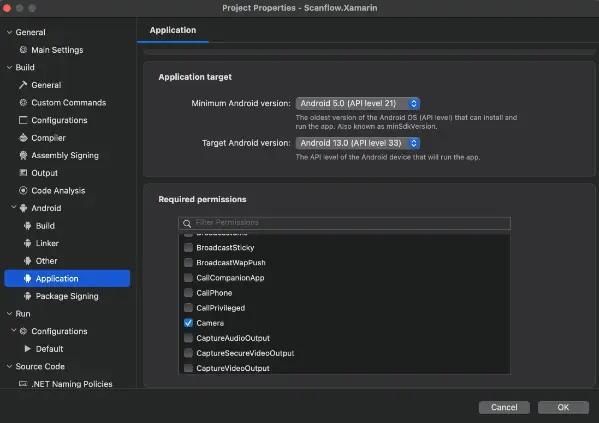
3. Adding Camera Permissions
Add the below camera permission to your AndroidManifest.xml file
<uses-permission android: name="android.permission.CAMERA" />
Note :Before starting the camera check the camera permission is granted.
4. Add an Uncompressed Resource extension
- Add a .tflite in your Android properties.
- Steps to add - Android Properties > Uncompressed Resource extension > add > .tflite
5. Initialize The Capture View in Xaml
I. Use CameraPreview to Visualize Scan
- Before you start, add the namespace to access the CameraView in your XAML file like this below.
xmlns:controls:"clr-namespace:Scanflow.BarcodeCapture.Xamarin.Forms;assembly=Scanflow.BarcodeCapture.Xamarin.Forms"
- CameraPreview is used to display the preview for camera and ViewFinderView to specify the area where scan performed on the desired region
- Steps to add - Android Properties > Uncompressed Resource extension > add > .tflite
                           <controls:CameraPreview
                           x:Name="barcodeCaptureScan"
                           OnScanResult="BarcodeCaptureScan_OnScanResult"
                           VerticalOptions="FillAndExpand"
                           HorizontalOptions="FillAndExpand"/>
6. Create the Data Capture Session
- Simple Usage to integrate Scanflow SDK inside your .cs file. Create barcodeCaptureScan.CreateScanSession with Create Scan Session. You need to pass your license key for SCANFLOW_LICENSE_KEY parameter. With session object only you can be able to access SDK
7. Setup BarcodeCapture Scanner Configuration
The Barcode Scanner has Three different features
- QR Code: This setting allows only 2D barcodes to be scanned, disregarding other code types.
- Barcode: This option exclusively scans 1D barcodes, ignoring other code types.
- Any: With this configuration, both 1D and 2D barcodes can be scanned.
This is how you can configure your .cs file
                           1. barcodeCaptureScan.CreateScanSession("Your License Key", DecodeConfig.Barcode, 0.5f);
                           2. barcodeCaptureScan.CreateScanSession(“Your License Key”, DecodeConfig.QRCode, 0.5f);
                           3. barcodeCaptureScan.CreateScanSession(“Your License Key”, DecodeConfig.Any, 0.5f);
First Parameter – Your License Key from Console.Scanflow
Second Parameter – Scanner Mode (Ex: Barcode, QR Code & Any )
Third Parameter – Pre-Zoom (float)
8. Scan Result CallBack
- In your xaml code use OnScanResult event for result callback
- OnScanResult returns the BarcodeCapture result object for Barcode, QR Code and Any Scanner
                           private void BarcodeCaptureScan_OnScanResult(ScanResult result)
                           {
                           }
9. Continuous Scan Feature
You can stop the continuous scanning by utilizing Continuous scan features. Here is an example
barcodeCaptureScan. SetIsContinuousScan(true);
After scanning, you can halt the continuous scan by setting SetIsContinuousScan to false:
barcodeCaptureScan. SetIsContinuousScan(false);
10. Start Scanning
barcodeCaptureScan.StartScanning();
- This is the method used to StartScanning.
11. Stop Scanning
barcodeCaptureScan.StopScanning();
- This is the method used to StopScanning.
12. Customize Addon Features
- These are some additional Addons for user customization. Users can be able to Change Beep Sound, Enable or Disable Vibration, Enable or Disable Play Beep Sound, Auto Flash Light Mode can be enabled or Disabled, Flash Light View can be modified
                           BarcodeCaptureScan.EnableTorch(true/false) // enable or disable auto flashlight mode
                           barcodeCaptureScan.EnableAutoExposure (true/false)//custom beep sound
                           barcodeCaptureScan.EnableAutoZoom(true/false) //enable or disable touch Zoom
                           barcodeCaptureScan.EnableAutoFlash (true/false) //enable or disable Auto flash feature
                           BarcodeCaptureScan.SetCameraResolution(CameraResolutionConfig.FullHd1080p) //setting camera resolution
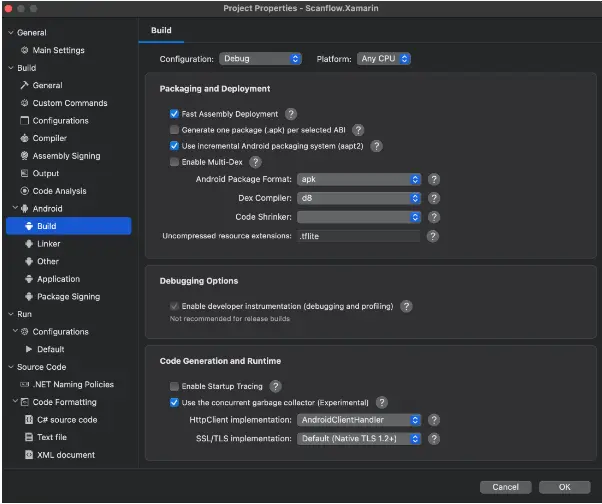
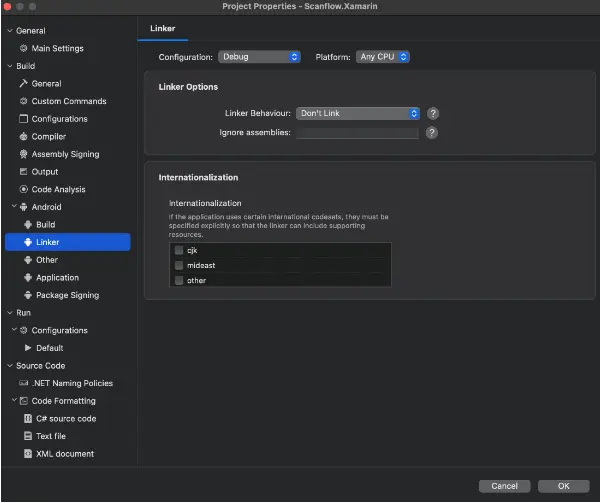
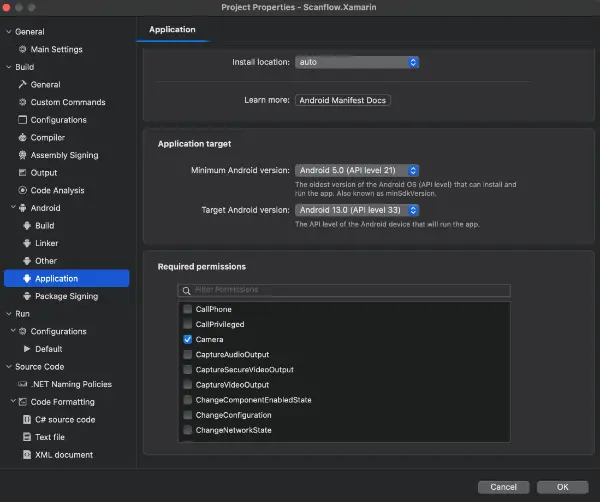
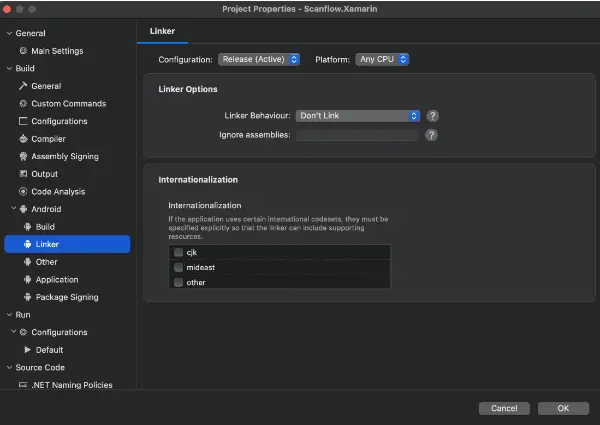
Debug Configurations:
Verify whether you have included the .tflite file in the Uncompressed Resource extension. Additionally, review the other configuration settings to ensure they align with the provided configuration details below.
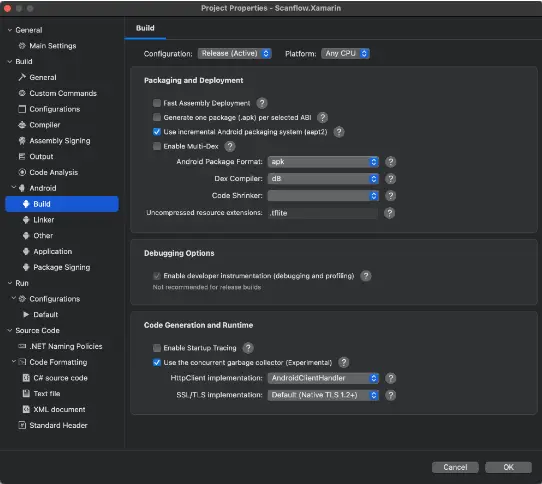
Release Configurations:
Verify whether you have included the .tflite file in the Uncompressed Resource extension. Additionally, review the other configuration settings to ensure they align with the provided configuration details below.
12. GitHub Repository Link
Link : Scanflow.Xamarin.Forms
Welcome to Scanflow SDK
Scanflow is an AI scanner on smart devices for data capture & workflow automation Kit that captures multiple data from Barcode, QR Code, Text, IDs, Safety codes
Key features:
Barcode scanning: Scanflow enables developers to quickly implement barcode / QR Code scanning into their applications running on different platforms.
Keyboard wedge: Integrate Scanflow Keyboard wedge scanner in any enterprise application and simplify workflow in industries. Instead of typing codes, one can simply touch and scan barcodes from any application.
Batch scanning: Implement Scanflow batch scanning in any smart device & capture any set of multiple code barcodes with a single scan. This highly intelligent data capture helps in transforming workflow operations with high speed and accuracy.
ID's: Capture data from any type of identity documents such as National ID cards, passports, employee IDs, and driving licenses. Transform any camera-equipped smart device into an enterprise-grade ID scanner and seamlessly automate workflow operations.
AR Measurements: With Scanflow AR measurements, scan any object to measure its dimensions without any manual meter tape. It can scan length, person height, surface plane detection, and facial attributes from any type of smart device.
Intelligent Text Scanning: Capture any form of alphanumeric text from objects, documents, or physical items. Integrate Scanflow on any smart device and capture a combination of texts and numbers.
Benefits:
- Boost your customer retention rates: Providing a seamless customer experience to your clients using a user-friendly mobile onboarding solution. This will allow you to reach out to clients through their preferred channel while still providing accurate results with few user-interface steps.
- Put yourself above the competition: Reduce the amount of work required from the end user to collect and transmit data during the onboarding process while still ensuring accurate back-end integration that processes the necessary data.
- Optimize your development resources: Integrate a ready-made, complete mobile capture solution without difficulty into your mobile application.
1. Generating a Scanflow License Key
Generating a Scanflow License - iOS
- You need a license key to utilize the Scanflow SDK in your application.
- You must determine the application bundle id of your iOS app in order to generate a license key for your application.
- An application bundle Id is used to generate each license. In case your application bundle id changes, a new license key must be generated. Please be aware that you cannot use your license key with other programmers.
In your signing and capabilities or info.plist file
The application bundle id for your app may be found in the info.plist file or in signing & capabilities
Purchase a License Key
- Create a free test account at https://console.scanflow.ai/ if you do not already have one if you want to use Scanflow.
- Visit https://console.scanflow.ai/login to access your account.
- Click "Create native SDK licensing key" and input the bundle ID for your project if you don't yet have a license key for your app.
- The license key should be copied.
Xamarin Native Platform
1. Getting Started
Add Scanflow.BarcodeCapture.Xamarin.iOS and Scanflow.TextCapture.Xamarin.iOS NuGet Package to Your APP
Prerequisites
To be able to use the Scanflow NuGet Package and Scanflow SDK (Software Development Kit), the following requirements must be met:
- Supported OS (Operating System): iOS 13.0 or higher.
- Development Environment: Visual Studio
- A valid Scanflow Data Capture SDK license key. You can sign up for a free test account at https://console.scanflow.ai
Add the NuGet Package and SDK to Your App
Scanflow.BarcodeCapture.Xamarin.iOS is distributed officially in NuGet.org.
- ScanflowCameraManager This manager functions consist of all camera-related operations like permission handling and then some image enhancing process.
- ScanflowCameraManager This manager functions consist of all camera related operations like permission handling and then some image enhancing process.
- ScanflowBarcodeManager,if you want use barcode related function like detecting and decoding process of barcode
- ScanflowTextManager, if you want to text recognition like OCR (Optical Character Recognition). This module consists of functionalities and process related to read text from anywhere.
Get Started with Barcode Capture:
1. Installing NuGet Package:
- Package > Right Click > Manage NuGet Packages > Browse > Scanflow.BarcodeCapture.Xamarin.iOS
- We must install these NuGet Package to integrate Barcode module.
2. Adding Camera & Location Permissions
                           Key : Privacy – Camera Usage Description
                           Value : $(PRODUCT_NAME) camera use
- To acquire data on the current condition of the library, your application needs a Camera Permission for Scanflow AI Scanner. So, confirm you have given app privacy camera usage description in your info.plist
                           Key : Privacy – Location When In Use Usage Description
                           Value : $(PRODUCT_NAME) location use
- To access the location of the scan. your application needs a Location Permission for Scanflow AI Scanner. So, confirm you have given app privacy Location When In Use Usage Description in your info.plist
3. Add a Namespace
using Scanflow.BarcodeCapture.Xamarin.iOS;
Add this namespace to your controller and then start creating an instance of object.
4. Create an instance of object
ScanflowBarCodeManager scanflowBarCodeManager = ScanflowBarCodeManager (UIView previewView, string scannerMode, string overlayApperance, bool overCropNeed, [NullAllowed] UIColor leftTopArc, [NullAllowed] UIColor leftDownArc, [NullAllowed] UIColor rightTopArc, [NullAllowed] UIColor rightDownArc, bool locationNeed)
- This is ScanflowBarCodeManager initializer function that create instance for ScanflowBarCodeManager Class.
Do this inside your view controller class.
Parameters
- previewView - need to pass UIView that present in our view controller, that we want to be act as camera view
- scannerMode - Need to pass a scanner type that available in our SDK like QR Code or Barcode
- ScannerMode.QRCode - Pass this for QR Code Scanning.
- ScannerMode.Barcode - Pass this for Barcode Scanning.
- ScannerMode.OneofMany - Pass this for OneofMany Scanning.
- ScannerMode.Any - Pass this for Any Scanning.
- ScannerMode.BatchInventory - Pass this for Batch/Inventory Scanning.
- ScannerMode.PivotView - Pass this for Pivot View Scanning.
- overlayApperance – we can be able to give rectangle overlay, square overlay or none. cropping will work on that given overlay shape. You can pass the OverlayApperance based on the Scanner Mode you select.
- OverlayApperance.Square
- OverlayApperance. Rectangle
- OverlayApperance.Hide
- OverlayApperance. HorizontalRectangle
- overCropNeeded - if cropped image is needed inside an overlay, we need to give true else need to give false
- leftTopArc - colour for left top arc of overlay
- LeftDownArc - colour for left downarc of overlay
- RightTopArc - colour for right top arc of overlay
- RightDownArc - colour for right down arc of overlay
- locationNeed – for accessing location
                           Example:
                           ScanflowBarCodeManager scanflowBarCodeManager = ScanflowBarCodeManager (this, ScannerMode.Barcode,  OverlayApperance.Square, false,, UIColor.Red,  UIColor.Yellow,  UIColor.White, UIColor.Purple,  true)
5. Validate License
public void ValidateLicense(string authKey)
This is the function used to validate the license generated from Scanflow website. we must pass below params here
Parameters
1. authKey - need to pass an auth key that is generated from scanflow website here
scanflowBarCodeManager.ValidateLicense (authKey: "--------AuthKey---------")
Call this function in view controller ViewDidLoad()
6. Start Session
scanflowBarCodeManager.StartSession()
This is the function used to start session Call this function in view controller ViewDidLoad()
7. Assigning delegate to Controller
scanflowBarCodeManager. WeakDelegate = this;
Call this function in view controller ViewDidLoad()
It asks to implement interface functions in your view controller, so that you can able to communicate with our SDK
8. Inherit the interface and its methods
Inherit the IScanflowCameraManagerDelegate in your View controller and it asks to implement the functions in your view controller.
PresentCameraPermissionDeniedAlert
it would give alert if you denied camera permission, because it must need for our sdk
PresentVideoConfigurationErrorAlert
it would give alert if configuration of camera it is not supported, or any error occurred in camera configuration
SessionRunTimeErrorOccurred
It will trigger when session run time error occurred
SessionWasInterrupted (bool resumeManually)
This function called when camera session interrupted, and it gives resumeManually Boolean variable.so that we can again start camera session
SessionInteruptionEnded
This function called when camera session interruption ended
ShowAlert(string title,string message)
This function called when camera sdk wants to show any message to user The message title and content will be passed as params in this function. Better users use this function for log purposes
CapturedOutput (string result, string codeType, string[] results, UIImage processedImage, CLLocation location)
This function is main output function of our SDK
it will give detected code in result variable
It will give detected code type in codeType variable
It will give detected codes in results array in case of multiple detection
It will give the detected codes location in location Variable.
Captured(CVPixelBuffer originalframe, CGRect overlayFrame, UIImage croppedImage)
This function is another output function of our SDK, here we can check the images captured from camera and what image will be sent to the detection as a input
it will give originalframe that is captured image in cvpixelbuffer format
It will give overlayFrame is the frame to be used for cropping the image
It will give croppedImage in UIImage format, for this you need to give crop needed option in initialize fun
9. Stop Session
scanflowBarCodeManager.StopSession();
This is the method used to Stop Session.
Get Started with Text Capture:
1. Installing NuGet Package:
- Package > Right Click > Manage NuGet Packages > Browse > Scanflow.TextCapture.Xamarin.iOS
- We must install these NuGet Package to integrate Barcode module.
- Download the latest version 1.2.1
2. Adding Camera & Location Permissions
                           Key : Privacy – Camera Usage Description
                           Value : $(PRODUCT_NAME) camera use
- To acquire data on the current condition of the library, your application needs a Camera Permission for Scanflow AI Scanner. So, confirm you have given app privacy camera usage description in your info.plist
                           Key : Privacy – Location When In Use Usage Description
                           Value : $(PRODUCT_NAME) location use
- To access the location of the scan. your application needs a Location Permission for Scanflow AI Scanner. So, confirm you have given app privacy Location When In Use Usage Description in your info.plist
3. Add a Namespace
Using Scanflow.TextCapture.Xamarin.iOS;
Add this namespace to your controller and then start creating an instance of object.
4. Create an instance of object
ScanflowTextManager ScanFlowManager = ScanflowTextManager (UIView previewView, string scannerMode, string overlayApperance, bool overCropNeed, UIColor leftTopArc, UIColor leftDownArc, UIColor rightTopArc, UIColor rightDownArc, bool locationNeed)
- This is ScanflowTextManager initializer function that create instance for ScanflowTextManager Class. Do this inside your view controller class.
Parameters
- previewView - need to pass UIView that present in our view controller, that we want to be act as camera view
- scannerMode - Need to pass a scanner mode that available in our SDK like ContainerHorizontal or ContainerVertical or Tire
- ScannerMode.ContainerHorizontal - For Horizontal Container
- ScannerMode.ContainerVertical - For Vertical Container
- ScannerMode.Tire - For Vertical Container
- overlayApperance – we can be able to give rectangle overlay, square overlay, or none. cropping will work on that given overlay shape. You can pass the overlayApperance based on the Scanner mode.
- OverlayApperance.ContainerHorizontal
- OverlayApperance. ContainerVertical
- overCropNeeded - if cropped image is needed inside an overlay, we need to give true else need to give false
- LeftTopArc - Color for the Left Top overlay Arc
- LeftDownArc - Color for the Left Down overlay Arc
- RightTopArc - Color for the Right Top overlay Arc
- RightDownArc - Color for the Right Down overlay Arc
- locationNeed – for accessing location
                           Example:
                           ScanflowTextManager ScanFlowManager = new ScanflowTextManager (this, ScannerMode.ContainerHorizontal, OverlayApperance.ContainerHorizontal, true, UIColor.Red, UIColor.Yellow, UIColor.White, UIColor.Purple, true)
5. Validate License
public void ValidateLicense(string authKey)
This is the function used to validate the license generated from Scanflow website. we must pass below params here
Parameters
1. authKey - need to pass an auth key that is generated from scanflow website here
scanflowBarCodeManager.ValidateLicense (authKey: "--------AuthKey---------")
Call this function in view controller ViewDidLoad()
6. Inherit the interface and its methods
Inherit the IScanflowCameraManagerDelegate in your View controller and it asks to implement the functions in your view controller.
PresentCameraPermissionDeniedAlert()
it would give alert if you denied camera permission, because it must need for our sdk
PresentVideoConfigurationAlert()
it would give alert if configuration of camera it is not supported, or any error occurred in camera configuration
SessionRunTimeErrorOccured()
It will trigger when session run time error occurred
SessionWasInterrupted (bool resumeManually)
This function called when camera session interrupted, and it gives resumeManually Boolean variable.so that we can again start camera session
ShowAlert(string title, string message)
This function called when camera sdk wants to show any message to user. The message title and content will be passed as params in this function. Better users use this function for log purposes
Captured(CVPixelBuffer originalframe, CGRect overlayFrame, UIImage croppedImage)
This function is another output function of our SDK, here we can check the images captured from camera and what image will be sent to the detection as a input.
it will give originalframe that is captured image in cvpixelbuffer format
It will giveoverlayFrameis the frame to be used for cropping the image
It will givecroppedImagein uiimage format, for this you need to give crop needed option in initialize function
CapturedOutput (string result, string codeType, string[] results, UIImage processedImage, CLLocation location)
This function is main output function of our SDK
it will give detected code in result variable
It will give detected codeype in codeType variable
It will give detected codes in results array in case of multiple detection
It will give detected codes location in location variable.
7. Assigning delegate to controller
ScanFlowManager. WeakDelegate = this;
Call this function in view controller ViewDidLoad()
It asks to implement interface functions in your view controller, so that you can be able to communicate with our SDK
8. Start Session
ScanFlowManager.StartSession()
This is the function used to start session Call this function in view controller ViewDidLoad()
9. Capture the date
ScanFlowManager.StartCaptureData();
This is the method used to Capture the datas.
10. Stop Session
ScanFlowManager.StopSession();
This is the method used to Stop Session.
API Reference
The Scanflow Data Capture SDK's basis for all data capture-related functionality is built on ScanflowCaptureCore. Shared classes and interfaces between the data capture modules are contained there.
Welcome to Scanflow SDK
Scanflow is an AI scanner on smart devices for data capture & workflow automation Kit that captures multiple data from Barcode, QR Code, Text, IDs, Safety codes
Key features:
Barcode scanning: Scanflow enables developers to quickly implement barcode / QR Code scanning into their applications running on different platforms.
Keyboard wedge: Integrate Scanflow Keyboard wedge scanner in any enterprise application and simplify workflow in industries. Instead of typing codes, one can simply touch and scan barcodes from any application.
Batch scanning: Implement Scanflow batch scanning in any smart device & capture any set of multiple code barcodes with a single scan. This highly intelligent data capture helps in transforming workflow operations with high speed and accuracy.
ID's: Capture data from any type of identity documents such as National ID cards, passports, employee IDs, and driving licenses. Transform any camera-equipped smart device into an enterprise-grade ID scanner and seamlessly automate workflow operations.
AR Measurements: With Scanflow AR measurements, scan any object to measure its dimensions without any manual meter tape. It can scan length, person height, surface plane detection, and facial attributes from any type of smart device.
Intelligent Text Scanning: Capture any form of alphanumeric text from objects, documents, or physical items. Integrate Scanflow on any smart device and capture a combination of texts and numbers.
Benefits:
- Boost your customer retention rates: Providing a seamless customer experience to your clients using a user-friendly mobile onboarding solution. This will allow you to reach out to clients through their preferred channel while still providing accurate results with few user-interface steps.
- Put yourself above the competition: Reduce the amount of work required from the end user to collect and transmit data during the onboarding process while still ensuring accurate back-end integration that processes the necessary data.
- Optimize your development resources: Integrate a ready-made, complete mobile capture solution without difficulty into your mobile application.
Getting Started
Add the NuGet Package
Follow these steps to include our Scanflow.Barcode.Maui NuGet Package in your app:
Package > Right Click > Manage NuGet Packages > Browse > Scanflow.Barcode.Maui
Install the latest version.
Adding Android Dependency Package:
Follow these steps to include the mandatory dependency NuGet package in your app:
Follow these steps to include our Scanflow.Barcode.Maui NuGet Package in your app
Package > Right Click > Manage NuGet Packages > Browse > xamarin.AndroidX.Tracing.Tracing.Ktx
Select Version and Install 1.3.0.1
Get Started with Implementing Barcode Capture
Add the below camera permission to your AndroidManifest.xml file
<uses-permission android:name="android.permission.CAMERA" />
Add an Uncompressed Resource extension
Add a .tflite in your Android properties.
Steps to add – Right click Solution > Properties > Build > Uncompressed Resource extension > add > .tflite
Initialize a handler
Open a MauiProgram.cs file and initialize the handler by using below lines
                                 .ConfigureMauiHandlers(handlers =>
                                 {
                                     InitializeScanflow.UseScanflow(handlers);
                                 });
Initialize Scan Activity
Open a MainActivity.cs file and initialize the activity in the OnCreate Method by using these below lines
ScanflowBarcodeCapture.InitScanflowActivity = this;
Initialize Camera View in Xaml
Create a Xaml page and initialize the CameraPreview please refer the below code
                                 <?xml version="1.0" encoding="utf-8" ?>
                                 <ContentPage xmlns="http://schemas.microsoft.com/3rtbel.'2021/maui"
                                 xmlns:x="http://schemas.microsoft.com/winfx/"
                                 xmlns:maui="clr-namespace:Scanflow.BarcodeCapture,scanflow.BarcodeCapture"
                                 x:Class="Scanflow.Barcode.App.MainPage">

                                     <maui:CameraPreview x:Name="scanPreview" />

                                 </ContentPage>
Add a x:Name for the preview to use it in Xaml.cs file.
Create Scan Session
Simple Usage to integrate Scanflow SDK . For Create Scan Session. You need to pass your license key.
scanPreview.CreateScanSession("PLACE A LICENSE KEY", BarcodeCapture.Maui.DecodeConfig.OneOfMany, 0.4f);
First parameter you have to pass your license key which you have created in https://console.scanflow.ai/ website.
Second parameter you must pass your corresponding scan types
Third parameter you must pass the PreZoom values in float type.
Scan Types
The Barcode Scanner has six different features
- Qrcode – It allows only 2D type barcode to be scanned scanned, other types of codes will be ignored
- Barcode - It allows only 1D type barcode to be scanned, other types of codes will be ignored
- Any - It allows both 1D & 2D type barcode scanned
- BatchInventory – it enables batch mode. still user reset I will save all types of 1D & 2D codes scanned by user
- OneOfMany – it enables one of many modes. Detected Code will be highlighted in overlayview user can be able to select by clicking on highlighted 1D/2D codes
- PivotView – Pivot view is also known for Single Hand use where among multiple 1D/2D codes on screen center of the screen will be scanned and result will be shown
BarcodeCapture.Maui.DecodeConfig.Any //pass scan type (Qrcode, Barcode, Any, BatchInventory , OneOfMany & PivotView)
Register Barcode Result Events
In Xaml.cs you must register your result events by using CameraPreview
                                 scanPreview.OnBatchScanResultsSuccess += ScanPreview_OnBatchScanResultsSuccess; //Returns the Batch Scan Barcode Result
                                 scanPreview.OnOneOfManyCodeRemoved += ScanPreview_OnOneOfManyCodeRemoved; //Returns Removed selected Result in ONE_OF_MANY Mode
                                 scanPreview.OnOneOfManyCodeResult += ScanPreview_OnOneOfManyCodeResult; //Returns all barcode results in array Selected One of many codes
                                 scanPreview.OnOneOfManyCodeSelected += ScanPreview_OnOneOfManyCodeSelected; //Returns Currently selected Result in ONE_OF_MANY Mode
                                 scanPreview.OnScanResult += ScanPreview_OnScanResult; //Returns the Barcode result object for qrcode, barcode and Any mode
                                 scanPreview.OnScanResultFailure += ScanPreview_OnScanResultFailure; //Returns the Reason when Scanner failed to Scan
Implement the Results events
                                 private void ScanPreview_OnScanResultFailure(string result)
                                 {
                                 }

                                 private void ScanPreview_OnScanResult(ScanResult result)
                                 {
                                 }

                                 private void ScanPreview_OnOneofManyCodeSelected(OneOfManyScanResult result)
                                 {
                                 }

                                 private void ScanPreview_OnOneOfManyCodeResult(OneOfManyScanResultList result)
                                 {
                                 }

                                 private void ScanPreview_OnOneofManyCodeRemoved (OneOfManyScanResult result)
                                 {
                                 }

                                 private void ScanPreview_OnBatchScanResultSuccess(ScanResultList result)
                                 {
                                 }
Start Camera
While Creating the Scan Session the camera will automatically start, and you can control by using these below lines.
scanPreview.StartScanning();
Stop Camera
The method below is used to Stop Camera.
scanPreview.StopScanning();
License Retry Validation
- This method is used to call the license retry validation
- Once the above method is called it will validate the license key and return the success or error response based on the below events
barcodeCaptureScan.RetryValidationResult(licenseKey);
                                 private async void BarcodeCaptureScan_OnLicenceOnFailureWithError(string error)
                                 {
                                     await MainThread.InvokeOnMainThreadAsync(async () => {
                                         await Toast.Make(error).Show();
                                     });
                                 }

                                 private async void BarcodeCaptureScan_OnLicenceOnSuccessWithResponse(string response)
                                 {
                                     await MainThread.InvokeOnMainThreadAsync(async () => {
                                         await Toast.Make(response).Show();
                                     });
                                 }
Customize Addon Features
These are some additional Addons for user customization. Users can be able to Change Beep Sound, Enable or Disable Vibration, Enable or Disable Play Beep Sound, Auto Flash Light Mode can be enabled or Disabled, Flash Light View can be modified
                                 cameraPreview.SetCameraResolution(CameraResolutionConfig.Hd720p); // To set the camera resolution
                                 cameraPreview.EnableTorch(false);
                                 cameraPreview.EnableAutoFlash(true); // Enable or disable
                                 cameraPreview.EnableAutoExposure(true); // Enable or disable auto Exposure
                                 cameraPreview.SetVibrate(true); // Enable or disable vibrate
                                 cameraPreview.SetPlayBeep(true); // Enable or disable play beep sound
                                 cameraPreview.SetIsContinuousScan(true); // By default true for continuous scan
License Validation Workflow:
The Scanflow SDK creates a lightweight license-validation session using the activity context and provided license key, registers the current class as the callback handler, and then performs remote license verification without initializing any camera resources.
                                 mScanflowReader = SFBaseCameraCapture.ScanSession.Instance.CreateLicenseSession(ScanflowBarcodeCapture.InitScanflowActivity,CameraPreview.LicenseKey);
                                 mScanflowReader.SetOnLicenseValidationCallback(this);
                                 mScanflowReader.DoValidateLicense();
GitHub Repository Link:
Link : GitHub
1. Generating a Scanflow License Key
Generating a Scanflow License - Android
- You need a license key to utilize the Scanflow SDK in your application.
- You must determine the applicationId of your Android app to generate a license key for your application.
- An applicationId is used to generate each license. If your applicationId changes, a new license key must be generated. Please be aware that you cannot use your license key with other programmers.
In your signing and capabilities or info.plist file
The application bundle id for your app may be found in the info.plist file or in signing & capabilities
Purchase a License Key
- Create a free test account at https://console.scanflow.ai/ if you do not already have one if you want to use Scanflow.
- Visit https://console.scanflow.ai/login to access your account.
- Click "Create native SDK licensing key" and input the bundle ID for your project if you don't yet have a license key for your app.
- The license key should be copied.
Flutter Native Platforms
Android
1. Getting Started
Add scanflow_scanner_barcode and scanflow_text flutter Package to Your APP
Prerequisites
These conditions must be satisfied to use the Scanflow SDK (Software Development Kit):
- OS (Operating System) supported: Android 5.0 (API Level 21) or higher.
- Supported ABIs include armeabi-v7a, arm64-v8a, x86, and x86 64.
- Visual Studio 2021 or later
- An Android device with a respectable camera (recommended: 720p and above)
Add the Package from pub.dev
Follow these steps to include our scanflow_scanner_barcode and scanflow_text Flutter Package in your app:
- Go to pub.dev
- Search scanflow_scanner_barcode and scanflow_text
- Get the latest version of both packages and add both dependencies in pubspec.yaml file in your project like given below:
dependencies:flutter:sdk:flutterscanflow_scanner_barcode:<latest_version>scanflow_text:<latest_version>permission_handler:<latest_version>
- To handle camera permission, we can use permission_handler from pub.dev.
- In your terminal run the following command to load the dependency in your app‘flutter pub get’.
2. Check our Sample & Demo Apps
Launch our Demo Apps
Start by running one of our sample apps if you want to get the most out of the Scanflow Data Capture SDK. This article will go over the various apps and explain how to use Android Studio to run them.
Here is a list of the samples we currently have for Android:
- Barcode Scan Samples
- Barcode Batch Scan Samples
- Multiple Barcode Selection Samples
- Text Data Capture Samples
You must follow a few steps before you can run a sample app:
- Create a free test account at https://console.scanflow.ai/ if you do not already have one if you want to use Scanflow.
- Visit https://console.scanflow.ai/login to access your account.
- Click "Create native SDK licensing key" and input the bundle ID for your project if you don't yet have a license key for your app.
- The license key should be copied.
Once you have it, include the license key in the example:
SCANFLOW_LICENSE_KEY = "-- YOUR SCANFLOW LICENSE KEY MUST BE ENTERED HERE --";
Each sample project Activity class has the SCANFLOW_LICENSE_KEY variables.
3. Release Guide
4. API Documentation
Barcode Scanner
Below you can find description of a basic Barcode capture scenario with user interface components.
1. Prerequisites
Follow these steps to include our Scanflow barcode dependency inside of your flutter app:
- Open your pubspec file and add scanflow_scanner_barcode under dependencies
dependencies:flutter:sdk:flutterscanflow_scanner_barcode:<latest_version>
- In your terminal run the following command to load the dependency in your app ‘flutter pub get’
Runtime Permission
Ask the camera permission inside init() method:
Permission.camera.request().isGranted.then((value) => setState(() {
if (value) {
//permission granted
} else {
log("::Permisson Required::");
}
}));
Use this Barcode Capture widget to scan
BarcodeCapture(
licenseKey: licenseKey,
scanType: widget.barcodeScanType.name,
barcodeScanResultBackHandler: callbackHandler),
Customize Addon Features
These are some additional Addons for user customization. Users can be able to Change Beep Sound, Enable or Disable Vibration, Enable or Disable Play Beep Sound, Auto Zoom...
const BarcodeCapture(
{Key? key,
required this.licenseKey,
this.isBeepSound,
this.isContinueScan,
this.isVibrate,
this.scanType,
this.isAutoExposure,
this.flashLight,
this.isAutoZoom,
required this.barcodeScanResultBackHandler})
: assert(licenseKey != null),
super(key: key);
Setup Barcode Scanner Configuration
The following props are explained in detail:
licenseKey (type: String):
The license key prop is a string value that represents the unique identifier or authorization code required to activate and authenticate the scanflow.
scanType (type: Pre-defined (String)):
The Barcode Scanner has six different features
| Type | Description |
|---|---|
| QRCODE | It allows only 2D-type barcodes to be scanned, other types of codes will be ignored. |
| BARCODE | It allows only 1D type barcode to be scanned, other types of codes will be ignored. |
| ANY | It allows both 1D & 2D type barcode scanned. |
| BATCH_INVENTORY | It enables batch mode. still user reset I will save all types of 1D & 2D codes scanned by user. |
| ONE_OF_MANY | It enables one of many modes. Detected Code will be highlighted in overlay view user can be able to select by clicking on highlighted 1D/2D codes. |
| PIVOT_VIEW | Pivot view is also known for Single Hand use where among multiple 1D/2D codes on screen centre of the screen will be scanned and result will be shown. |
isBeepSound (type:boolen)
- The isBeepSound prop is a boolean value that controls whether or not a beep sound is played in a specific scenario.
- When set to true, the component or feature associated with the isBeepSound prop will generate an audible beep sound to provide feedback or indicate a successful operation.
- On the other hand, when set to false, the beep sound will be disabled.
- By toggling the isBeepSound prop based on your application's specific requirements, you can customize the presence or absence of the beep sound, aligning it with your desired user experience and interaction design.
isVibrarte (type:boolen):
- The `isVibration` prop is a boolean value that controls whether or not vibration feedback is enabled in a specific scenario.
- When set to `true`, the component or feature associated with the `isVibration` prop will trigger device vibration to provide haptic feedback or indicate a successful operation.
- On the other hand, when set to `false`, the vibration feedback will be disabled.
- By toggling the `isVibration` prop based on your application's specific needs, you can customize the presence or absence of vibration feedback, aligning it with your desired user experience and interaction design.
isFlashLight (type:boolen):
- The isAutoFlashlight prop is a boolean value that determines whether the flashlight on the device is automatically enabled or disabled in a while scanning.
isAutoExposure (type:boolen):
- The isAutoExposure prop is a boolean value that controls whether the exposure of a camera or image capture feature is automatically adjusted based on lighting conditions (true) or manually adjusted (false).
isContinueScan (type:boolen):
- The isContinuousScan prop is a boolean value that determines whether the scanning process continues automatically after detecting a barcode (true) or stops after scanning one barcode (false).
IsAutoZoom (type:boolen):
- The isAutoZoom prop is a boolean value that determines whether the zoom level of a camera or image capture feature is automatically adjusted based on certain conditions (true) or requires manual adjustment (false).
SetCameraResolution (type:predefinedString)
| Type | Description |
|---|---|
| SD_480P | Standard Definition (480p) is a video resolution option that offers moderate image quality and lower file sizes suitable for playback on various devices and streaming platforms. |
| HD_720P | High Definition (720p) is a video resolution option that provides enhanced image quality with sharper details, making it ideal for high-quality video playback on HD-compatible screens. |
| FULL_HD_1080P | Full HD (1080p) is a video resolution option that delivers excellent image quality with crisp and detailed visuals, suitable for larger screens and immersive viewing experiences. |
| UHD_4K | Ultra HD (4K) is a video resolution option that offers incredibly high image quality with exceptional clarity and vividness, providing an immersive and lifelike viewing experience on compatible screens. |
Resister Barcode Result CallBack
class_BarcodeScanningStateextendsState<BarcodeScanning>
implements BarcodeScanResultCallback {
String? licenseKey = "";
@override
void didUpdateWidget(covariant BarcodeScanning oldWidget) {
super.didUpdateWidget(oldWidget);
}
@override
void dispose() {
super.dispose();
}
@override
Widgetbuild (BuildContext context) {
BarcodeScanResultCallbackHandler callbackHandler =
BarcodeScanResultCallbackHandler();
// Register this widget as the callback
callbackHandler.registerCallback(this);
return.Scaffold(
backgroundColor: Colors.black,
appBar: AppBar(
title: Text(
widget.barcodeScanType.name,
style: const TextStyle(fontWeight: FontWeight.bold),
),
),
body: Container(
color: Colors.black,
child:BarcodeCapture(
licenseKey, licenseKey,
scanType: widget.barcodeScanType.name,
barcodeScanResultBackHandler: callbackHandler),
));
}
@override
voidbatchScanResult(List<BatchScanResult> batchScanResult) {
}
@override
voidonScanResultSuccess(ScanResultSuccess scanResultSuccess) {
}
@override
voidoneOfManyResult(List<OneOfManyResult> oneOfManyResult) {
}
@override
voidonScanResultFailure(String message) {
}
}
Text Scanner
Below you can find description of a basic Text capture scenario with user interface components.
1. Prerequisites
Follow these steps to include our Scanflow text dependency inside of your flutter app:
- Open your pubspec file and add scanflow_text under dependencies
dependencies:
flutter:
sdk:flutter
scanflow_text:<latest_version>
- In your terminal run the following command to load the dependency in your app ‘flutter pub get’
Runtime Permission
Ask the camera permission inside init() method:
Permission.camera.request().isGranted.then((value) => setState(() {
if (value) {
//permission granted
} else {
log("::Permisson Required::");
}
}));
Use this Barcode Capture widget
TextCapture(
licenseKey: licenseKey,
scanType: widget.textScanType.name,
textScanResultBackHandler: callbackHandler)
Customize Addon Features
These are some additional Addons for user customization. Users can be able to Change Beep Sound, Enable or Disable Vibration, Enable or Disable Play Beep Sound, Auto Zoom...
TextCapture(
{Key? key,
required this.licenseKey,
this.isBeepSound,
this.isContinueScan,
this.isVibrate,
this.scanType,
this.isAutoExposure,
this.flashLight,
this.isAutoZoom,
required this.textScanResultBackHandler})
Resister Barcode Result CallBack
classTextScanningextendsStatefulWidget {
const TextScanning({Key? key, required this.textScanType}) : super(key: key);
final TextScanType textScanType
@override
State<TextScanning> createState() => _TextScanningState();
}
class_TextScanningStateextends State<TextScanning>
implements TextScanResultCallback {
String?licenseKey = "";
@override
void didUpdateWidget( covariantTextScanning oldWidget) {
super.didUpdateWidget(oldWidget);
}
@override
void dispose () {
super..dispose();
@override
Widgetbuild (BuildContext context) {
TextScanResultCallbackHandler callbackHandler =
TextScanResultCallbackHandler();
// Register this widget as the callback
callbackHandler.registerCallback(this);
return.Scaffold(
backgroundColor: Colors.black,
appBar: AppBar(
title: Text(
widget.textScanType.name,
style: const TextStyle(fontWeight: FontWeight.bold),
),
),
body: Container(
color: Colors.black,
child:TextCapture(
licenseKey, licenseKey,
scanType: widget.textScanType.name,
textScanResultBackHandler: callbackHandler),
));
}
@override
voidonTextScanResultSuccess(TextScanResult textScanResult) {
}
@override
voidonTextScanResultFailure(String message) {
}
}
OnTextScanResultSuccess – return the result success class.
Welcome to Scanflow SDK
Scanflow is an AI scanner on smart devices for data capture & workflow automation Kit that captures multiple data from Barcode, QR Code, Text, IDs, Safety codes
Key features:
Barcode scanning: Scanflow enables developers to quickly implement barcode / QR Code scanning into their applications running on different platforms.
Keyboard wedge: Integrate Scanflow Keyboard wedge scanner in any enterprise application and simplify workflow in industries. Instead of typing codes, one can simply touch and scan barcodes from any application.
Batch scanning: Implement Scanflow batch scanning in any smart device & capture any set of multiple code barcodes with a single scan. This highly intelligent data capture helps in transforming workflow operations with high speed and accuracy.
ID's: Capture data from any type of identity documents such as National ID cards, passports, employee IDs, and driving licenses. Transform any camera-equipped smart device into an enterprise-grade ID scanner and seamlessly automate workflow operations.
AR Measurements: With Scanflow AR measurements, scan any object to measure its dimensions without any manual meter tape. It can scan length, person height, surface plane detection, and facial attributes from any type of smart device.
Intelligent Text Scanning: Capture any form of alphanumeric text from objects, documents, or physical items. Integrate Scanflow on any smart device and capture a combination of texts and numbers.
Benefits:
- Boost your customer retention rates: Providing a seamless customer experience to your clients using a user-friendly mobile onboarding solution. This will allow you to reach out to clients through their preferred channel while still providing accurate results with few user-interface steps.
- Put yourself above the competition: Reduce the amount of work required from the end user to collect and transmit data during the onboarding process while still ensuring accurate back-end integration that processes the necessary data.
- Optimize your development resources: Integrate a ready-made, complete mobile capture solution without difficulty into your mobile application.
1. Generating a Scanflow License Key
Generating a Scanflow License - iOS
- You need a license key to utilize the Scanflow SDK in your application.
- You must determine the application bundle id of your iOS app in order to generate a license key for your application.
- An application bundle Id is used to generate each license. In case your application bundle id changes, a new license key must be generated. Please be aware that you cannot use your license key with other programmers.
In your signing and capabilities or info.plist file
The application bundle id for your app may be found in the info.plist file or in signing & capabilities
Purchase a License Key
- Create a free test account at https://console.scanflow.ai/ if you do not already have one if you want to use Scanflow.
- Visit https://console.scanflow.ai/login to access your account.
- Click "Create native SDK licensing key" and input the bundle ID for your project if you don't yet have a license key for your app.
- The license key should be copied.
Flutter Native Platforms
IOS
1. Getting Started
Add Scanflow SDK to Your APP
Prerequisites
To be able to use the Scanflow SDK (Software Development Kit), the following requirements must be met:
- Supported OS (Operating System): iOS 11.0 or higher.
- Development Environment: XCode 11.0+ and swift version = "5.0+"
- A valid Scanflow Data Capture SDK license key. You can sign up for a free test account at https://scanflow.ai/
Add the SDK
Add the library and its components to your project to construct an application that uses the Scan flow Ai Capture SDK. You can add new projects or existing project bundled code examples that are ready to use right out of the box.
ScanflowCore, ScanflowBarcode, ScanflowText SDK’s are distributed officially in cocoapods .
You must always need to add a reference to AVCaptureSession which contains the shared functionality used by the other data capture modules. In addition, depending on the data capture task, you will need a reference to:
- ScanflowCameraManagerThis manager functions consist of all camera related operations like permission handling and then some image enhancing process.
- ScanflowBarcodeManager,if you want use barcode related function like detecting and decoding process of barcode
- ScanflowTextManager,if you want to text recognition like OCR (Optical Character Recognition). This module consists of functionalities and process related to read text from anywhere.
Info.Plist
To acquire data on the current condition of the library, your application needs an Internet connection and Camera Permission for Scanflow AI Scanner. So confirm you have given app privacy camera usage description in your info.plist
Key : Privacy - Camera Usage Description
Value : $(PRODUCT_NAME) camera use
Key : Privacy - Location Always and When In Use Usage Description
Value : $(PRODUCT_NAME) location access
2. Check our Sample & Demo Apps
Launch our Demo Apps
Start by running one of our sample apps if you want to get the most out of the Scanflow Data Capture SDK. This article will go over the various apps and explain how to use Android Studio to run them.
Here is a list of the samples we currently have for Android:
- Barcode Scan Samples
- Barcode Batch Scan Samples
- Multiple Barcode Selection Samples
- Text Data Capture Samples
You must follow a few steps before you can run a sample app:
- Create a free test account at https://console.scanflow.ai/ if you do not already have one if you want to use Scanflow.
- Visit https://console.scanflow.ai/login to access your account.
- Click "Create native SDK licensing key" and input the bundle ID for your project if you don't yet have a license key for your app.
- The license key should be copied.
Once you have it, include the license key in the example:
SCANFLOW_LICENSE_KEY = "-- YOUR SCANFLOW LICENSE KEY MUST BE ENTERED HERE --";
Each sample project Activity class has the SCANFLOW_LICENSE_KEY variables.
3. Release Guide
4. API Documentation
Barcode Scanner
Below you can find description of a basic Barcode capture scenario with user interface components.
1. Prerequisites
Follow these steps to include our Scanflow barcode dependency inside of your flutter app:
- Open your pubspec file and add scanflow_scanner_barcode under dependencies
                                    dependencies:

                                    flutter:
                                    sdk:flutter

                                    scanflow_scanner_barcode:<latest_version>
- In your terminal run the following command to load the dependency in your app ‘flutter pub get’
Runtime Permission
Ask the camera permission inside init() method:
                                 Permission.camera.request().isGranted.then((value) => setState(() {

                                 if (value) {
                                 //permission granted
                                 } else {
                                 log("::Permisson Required::");
                                 }
                                 }));
Use this Barcode Capture widget to scan
                                 BarcodeCapture(

                                  licenseKey: licenseKey,
                                 scanType: widget.barcodeScanType.name,
                                 barcodeScanResultBackHandler: callbackHandler),
Customize Addon Features
These are some additional Addons for user customization. Users can be able to Change Beep Sound, Enable or Disable Vibration, Enable or Disable Play Beep Sound, Auto Zoom...
                                 const BarcodeCapture(

                                  {Key? key,
                                 required this.licenseKey,
                                 this.isBeepSound,
                                 this.isContinueScan,
                                 this.isVibrate,
                                 this.scanType,
                                 this.isAutoExposure,
                                 this.flashLight,
                                 this.isAutoZoom,
                                  required this.barcodeScanResultBackHandler})
                                 : assert(licenseKey !=  null),
                                 super(key: key);
Setup Barcode Scanner Configuration
The following props are explained in detail:
licenseKey (type: String):
The license key prop is a string value that represents the unique identifier or authorization code required to activate and authenticate the scanflow.
scanType (type: Pre-defined (String)):
The Barcode Scanner has six different features
Type
Description
QR CODE
It allows only 2D-type barcodes to be scanned, other types of codes will be ignored.
BARCODE
It allows only 1D type barcode to be scanned, other types of codes will be ignored.
ANY
It allows both 1D & 2D type barcode scanned.
BATCH_INVENTORY
It enables batch mode. still user reset I will save all types of 1D & 2D codes scanned by user.
ONE_OF_MANY
It enables one of many modes. Detected Code will be highlighted in overlay view user can be able to select by clicking on highlighted 1D/2D codes.
PIVOT_VIEW
Pivot view is also known for Single Hand use where among multiple 1D/2D codes on screen centre of the screen will be scanned and result will be shown.
isBeepSound (type:boolen)
- The isBeepSound prop is a boolean value that controls whether or not a beep sound is played in a specific scenario.
- When set to true, the component or feature associated with the isBeepSound prop will generate an audible beep sound to provide feedback or indicate a successful operation.
- On the other hand, when set to false, the beep sound will be disabled.
- By toggling the isBeepSound prop based on your application's specific requirements, you can customize the presence or absence of the beep sound, aligning it with your desired user experience and interaction design.
isVibrarte (type:boolen):
- The `isVibration` prop is a boolean value that controls whether or not vibration feedback is enabled in a specific scenario.
- When set to `true`, the component or feature associated with the `isVibration` prop will trigger device vibration to provide haptic feedback or indicate a successful operation.
- On the other hand, when set to `false`, the vibration feedback will be disabled.
- By toggling the `isVibration` prop based on your application's specific needs, you can customize the presence or absence of vibration feedback, aligning it with your desired user experience and interaction design.
isFlashLight (type:boolen):
- The isAutoFlashlight prop is a boolean value that determines whether the flashlight on the device is automatically enabled or disabled in a while scanning.
isAutoExposure (type:boolen):
- The isAutoExposure prop is a boolean value that controls whether the exposure of a camera or image capture feature is automatically adjusted based on lighting conditions (true) or manually adjusted (false).
isContinueScan (type:boolen):
- The isContinuousScan prop is a boolean value that determines whether the scanning process continues automatically after detecting a barcode (true) or stops after scanning one barcode (false).
IsAutoZoom (type:boolen):
- The isAutoZoom prop is a boolean value that determines whether the zoom level of a camera or image capture feature is automatically adjusted based on certain conditions (true) or requires manual adjustment (false).
SetCameraResolution (type:predefinedString)
Type
Description
SD_480P
Standard Definition (480p) is a video resolution option that offers moderate image quality and lower file sizes suitable for playback on various devices and streaming platforms.
HD_720P
High Definition (720p) is a video resolution option that provides enhanced image quality with sharper details, making it ideal for high-quality video playback on HD-compatible screens.
FULL_HD_1080P
Full HD (1080p) is a video resolution option that delivers excellent image quality with crisp and detailed visuals, suitable for larger screens and immersive viewing experiences.
UHD_4K
Ultra HD (4K) is a video resolution option that offers incredibly high image quality with exceptional clarity and vividness, providing an immersive and lifelike viewing experience on compatible screens.
Resister Barcode Result CallBack
class_BarcodeScanningStateextendsState<BarcodeScanning>
implements BarcodeScanResultCallback {
String? licenseKey = "";
@override
void didUpdateWidget(covariant BarcodeScanning oldWidget) {
super.didUpdateWidget(oldWidget);
}
@override
void dispose() {
super.dispose();
}
@override
Widgetbuild (BuildContext context) {
BarcodeScanResultCallbackHandler callbackHandler =
BarcodeScanResultCallbackHandler();
// Register this widget as the callback
callbackHandler.registerCallback(this);
return.Scaffold(
backgroundColor: Colors.black,
appBar: AppBar(
title: Text(
widget.barcodeScanType.name,
style: const TextStyle(fontWeight: FontWeight.bold),
),
),
body: Container(
color: Colors.black,
child:BarcodeCapture(
licenseKey, licenseKey,
scanType: widget.barcodeScanType.name,
barcodeScanResultBackHandler: callbackHandler),
));
}
@override
voidbatchScanResult(List<BatchScanResult> batchScanResult) {
}
@override
voidonScanResultSuccess(ScanResultSuccess scanResultSuccess) {
}
@override
voidoneOfManyResult(List<OneOfManyResult> oneOfManyResult) {
}
@override
voidonScanResultFailure(String message) {
}
}
Text Scanner
Below you can find description of a basic Text capture scenario with user interface components.
1. Prerequisites
Follow these steps to include our Scanflow text dependency inside of your flutter app:
- Open your pubspec file and add scanflow_text under dependencies
dependencies:
flutter:
sdk:flutter
scanflow_text:<latest_version>
- In your terminal run the following command to load the dependency in your app ‘flutter pub get’
Runtime Permission
Ask the camera permission inside init() method:
Permission.camera.request().isGranted.then((value) => setState(() {
if (value) {
//permission granted
} else {
log("::Permisson Required::");
}
}));
Use this Barcode Capture widget
TextCapture(
licenseKey: licenseKey,
scanType: widget.textScanType.name,
textScanResultBackHandler: callbackHandler)
Customize Addon Features
These are some additional Addons for user customization. Users can be able to Change Beep Sound, Enable or Disable Vibration, Enable or Disable Play Beep Sound, Auto Zoom...
TextCapture(
{Key? key,
required this.licenseKey,
this.isBeepSound,
this.isContinueScan,
this.isVibrate,
this.scanType,
this.isAutoExposure,
this.flashLight,
this.isAutoZoom,
required this.textScanResultBackHandler})
Resister Barcode Result CallBack
classTextScanningextendsStatefulWidget {
const TextScanning({Key? key, required this.textScanType}) : super(key: key);
final TextScanType textScanType
@override
State<TextScanning> createState() => _TextScanningState();
}
class_TextScanningStateextends State<TextScanning>
implements TextScanResultCallback {
String?licenseKey = "";
@override
void didUpdateWidget( covariantTextScanning oldWidget) {
super.didUpdateWidget(oldWidget);
}
@override
void dispose () {
super..dispose();
@override
Widgetbuild (BuildContext context) {
TextScanResultCallbackHandler callbackHandler =
TextScanResultCallbackHandler();
// Register this widget as the callback
callbackHandler.registerCallback(this);
return.Scaffold(
backgroundColor: Colors.black,
appBar: AppBar(
title: Text(
widget.textScanType.name,
style: const TextStyle(fontWeight: FontWeight.bold),
),
),
body: Container(
color: Colors.black,
child:TextCapture(
licenseKey, licenseKey,
scanType: widget.textScanType.name,
textScanResultBackHandler: callbackHandler),
));
}
@override
voidonTextScanResultSuccess(TextScanResult textScanResult) {
}
@override
voidonTextScanResultFailure(String message) {
}
}
OnTextScanResultSuccess – return the result success class.
Welcome to Scanflow SDK
Scanflow is an AI scanner on smart devices for data capture & workflow automation Kit that captures multiple data from Barcode, QR Code, Text, IDs, Safety codes
Key features:
Barcode scanning: Scanflow enables developers to quickly implement barcode / QR Code scanning into their applications running on different platforms.
Batch scanning: Implement Scanflow batch scanning in any smart device & capture any set of multiple code barcodes with a single scan. This highly intelligent data capture helps in transforming workflow operations with high speed and accuracy.
Benefits:
- Boost your customer retention rates: Providing a seamless customer experience to your clients using a user-friendly mobile onboarding solution. This will allow you to reach out to clients through their preferred channel while still providing accurate results with few user-interface steps.
- Put yourself above the competition: Reduce the amount of work required from the end user to collect and transmit data during the onboarding process while still ensuring accurate back-end integration that processes the necessary data.
- Optimize your development resources: Integrate a ready-made, complete mobile capture solution without difficulty into your mobile application.
1. Generating a Scanflow License Key
Generating a Scanflow License - Android
- You need a license key to utilize the Scanflow SDK in your application.
- You must determine the applicationId of your Android app to generate a license key for your application.
- An applicationId is used to generate each license. If your applicationId changes, a new license key must be generated. Please be aware that you cannot use your license key with other programmers.
In your build.gradle file
The applicationId for your app may be found in the build.gradle file of the Android Project. Under Android > DefaultConfig > ApplicationId, it will be displayed.
In your AndroidManifest.xml
You must use the package name of your application as described in AndroidManifest.xml if the applicationId is not used in the build.gradle file.
Purchase a License Key
- Create a free test account at https://console.scanflow.ai/ if you do not already have one if you want to use Scanflow.
- Visit https://console.scanflow.ai/login to access your account.
- Click "Create native SDK licensing key" and input the bundle ID for your project if you don't yet have a license key for your app.
- The license key should be copied.
React Native Platforms
1. Getting Started
The React Native section of this documentation provides a comprehensive overview of the key components of Scanflow AI barcode. It serves as a guided tour, equipping you with the necessary knowledge to construct your mobile application and lays the foundation for exploring more advanced functionalities of barcode scanning. This section will cover the essential aspects, ensuring you have a solid understanding the more advanced features of Scanflow's barcode scanning capabilities.
Prerequisites
These conditions must be satisfied in order to use the Scanflow SDK (Software Development Kit):
- OS (Operating System) supported: Android 5.0 (API Level 21) or higher.
- Supported ABIs include armeabi-v7a, arm64-v8a, x86, and x86 64.
- Android Studio 4.2 or later and Kotlin version "1.6.10" are required for development.
- An Android device with a respectable camera (recommended: 720p and above)
Add the SDK
To integrate the Scanflow AI Capture SDK into your project and develop an application, follow the steps below:
Depedency Library
The Scanflow Core library comprises core utilities specifically designed for barcode scanning purposes. These utilities provide essential functionality and tools necessary for seamless barcode scanning within your application. By incorporating the Scanflow library into your project, you can leverage these core utilities to enhance your barcode scanning capabilities and streamline related processes. Start by installing the following command:
npm i react-native-datacapture-core
If you already have the required libraries installed and they are up to date, there is no need to execute the above command for installation.
Library Installation
- Start by installing the Scanflow AI Capture SDK library in your project. You can do this by running the following command:
npm i react-native-datacapture-barcode
npm i react-native-datacapture-text
This will install the required dependencies
Permission
Android
Important: To access real-time data and ensure the proper functioning of the library, your application requires an active internet connection and the necessary camera permissions for Scanflow AI Barcode Scanner. Please add the following line to your AndroidManifest.xml file:
<uses-permission android:name="android.permission.INTERNET" />
<uses-permission android:name="android.permission.CAMERA" />
<uses-permission android:name="android.hardware.camera.flash" />
<uses-permission android:name="android.permission.FLASHLIGHT" />
<uses-permission android:name="android.permission.READ_EXTERNAL_STORAGE" />
<uses-permission android:name="android.permission.WRITE_EXTERNAL_STORAGE" android:maxSdkVersion="28" />
This will grant the required camera permission to the application, enabling the Scanflow AI Barcode Scanner to capture barcode data effectively.
Explore our Sample & Demo App
Look at our Sample & Demo App to get a hands-on experience of the capabilities offered by our solution. This app serves as an excellent resource to understand the functionalities and features available with our technology. You can explore real-life use cases, interact with the app, and witness the potential of our solution in action.
To run a sample module, follow these steps:
- Download or clone the sample module code from the provided source. You can typically find this on a GitHub repository or a dedicated project website.
- Open your preferred development environment or command-line interface. Navigate to the directory where the sample module code is located.
- Install any additional dependencies or packages required by the sample module. This can usually be done using a package manager like npm. Use the following command:
npm install
npm run android
By following these steps, you can run the sample module and explore its functionalities.
We have created a variety of sample applications to showcase the functionalities of the Scanflow AI Barcode SDK. The basic samples serve as an excellent starting point, providing a simple and straightforward implementation that allows you to get up and running quickly. These samples are designed to help you understand the fundamental usage of the SDK and its core features.
Whether you are looking for a quick start or want to dive deeper into the advanced settings, our sample applications have you covered. They provide a comprehensive range of examples to support your learning and implementation process with the Scanflow Data Capture SDK.
Here is a list of the samples we currently have for Android:
- Barcode Scan Samples
- Barcode Batch Scan Samples
- Multiple Barcode Selection Samples
- ID Card Capture Samples
- Text Data Capture Samples
You must follow a few steps before you can run a sample app:
- Create a free test account at https://console.scanflow.ai/ if you do not already have one if you want to use Scanflow.
- Visit https://console.scanflow.ai/login to access your account.
- Click "Create native SDK licensing key" and input the bundle ID for your project if you don't yet have a license key for your app.
- The license key should be copied. Once you have it, include the license key in the example
Once you have it, include the license key in the example:
<DatacaptureBarcode LicenseKey {"YOUR SCANFLOW LICENSE KEY MUST BE ENTER HERE"}/>
Each sample project Activity class has the SCANFLOW_LICENSE_KEY variables.
3. Release Guide
4. API Documentation
Barcode Scanner
Basic usage examples of the library
Importing the Barcode component
import {DatacaptureBarcode} from 'react-native-datacapture-barcode';
Use the Barcode Component in your app
<DatacaptureBarcode
LicenseKey={"YOUR SCANFLOW LICENSE KEY MUST BE ENTER HERE"}
isBeepSound={true} //enable or disable play beep sound
isScanType={“ANY}
isVibrartion={true} //enable or disable vibrate
isAutoFlashlight={true} //enable or disable auto flashlight mode
isAutoExposure={true}
isContinuousScan={true} //by default true for continuous scan
isAutoZoom={false} //enable or disable auto zoom mode
setCameraResolution={“FILL_HD_1080P”}
/>
Setup Barcode Scanner Configuration
The following props are explained in detail:
licenseKey (type: String):
The license key prop is a string value that represents the unique identifier or authorization code required to activate and authenticate the scanflow.
isScanType (type: predefined String)
The Barcode Scanner has six different features
Type
Description
QR CODE
It allows only 2D-type barcodes to be scanned, other types of codes will be ignored.
BARCODE
It allows only 1D type barcode to be scanned, other types of codes will be ignored.
ANY
It allows both 1D & 2D type barcode scanned.
BATCH_INVENTORY
It enables batch mode. still user reset I will save all types of 1D & 2D codes scanned by user.
ONE_OF_MANY
It enables one of many modes. Detected Code will be highlighted in overlay view user can be able to select by clicking on highlighted 1D/2D codes.
PIVOT_VIEW
Pivot view is also known for Single Hand use where among multiple 1D/2D codes on screen centre of the screen will be scanned and result will be shown.
isBeepSound (type:boolen)
- The isBeepSound prop is a boolean value that controls whether or not a beep sound is played in a specific scenario.
- When set to true, the component or feature associated with the isBeepSound prop will generate an audible beep sound to provide feedback or indicate a successful operation.
- On the other hand, when set to false, the beep sound will be disabled.
- By toggling the isBeepSound prop based on your application's specific requirements, you can customize the presence or absence of the beep sound, aligning it with your desired user experience and interaction design.
IsVibrartion (type:boolen):
- The `isVibration` prop is a boolean value that controls whether or not vibration feedback is enabled in a specific scenario.
- When set to `true`, the component or feature associated with the `isVibration` prop will trigger device vibration to provide haptic feedback or indicate a successful operation.
- On the other hand, when set to `false`, the vibration feedback will be disabled.
- By toggling the `isVibration` prop based on your application's specific needs, you can customize the presence or absence of vibration feedback, aligning it with your desired user experience and interaction design.
IsAutoFlashLight (type:boolen)
- The isAutoFlashlight prop is a boolean value that determines whether the flashlight on the device is automatically enabled or disabled in a while scanning.
IsAutoExposure (type:boolen)
- The isAutoExposure prop is a boolean value that controls whether the exposure of a camera or image capture feature is automatically adjusted based on lighting conditions (true) or manually adjusted (false).
IsContinuousScan (type:boolen)
- The isContinuousScan prop is a boolean value that determines whether the scanning process continues automatically after detecting a barcode (true) or stops after scanning one barcode (false).
IsAutoZoom (type:boolen)
- The isAutoZoom prop is a boolean value that determines whether the zoom level of a camera or image capture feature is automatically adjusted based on certain conditions (true) or requires manual adjustment (false).
SetCameraResolution (type:predefinedString)
Type
Description
SD_480P
Standard Definition (480p) is a video resolution option that offers moderate image quality and lower file sizes suitable for playback on various devices and streaming platforms.
HD_720P
High Definition (720p) is a video resolution option that provides enhanced image quality with sharper details, making it ideal for high-quality video playback on HD-compatible screens.
FULL_HD_1080P
Full HD (1080p) is a video resolution option that delivers excellent image quality with crisp and detailed visuals, suitable for larger screens and immersive viewing experiences.
UHD_4K
Ultra HD (4K) is a video resolution option that offers incredibly high image quality with exceptional clarity and vividness, providing an immersive and lifelike viewing experience on compatible screens.
Barcode Result Listener:
useEffect(() => {
eventEmitter.addListener('onBatchScanResult', onBatchScanResultSuccess);
eventEmitter.addListener('onOneOfManyCodeResult', onOneOfManyCodeResult);
eventEmitter.addListener(''onOneofManyCodeRemoved', onOneofManyCodeRemoved);
eventEmitter.addListener('onOneofManyCodeSelected', onOneofManyCodeSelected);
eventEmitter.addListener('onScanBarcodeDetection', onScanBarcodeDetection);
eventEmitter.addListener(''onScanResultFailure', onScanResultFailure);
eventEmitter.addListener('onScanResultSuccess', onScanResultSuccess);
return () => {
eventEmitter.removeAllListeners(''onBatchScanResult');
eventEmitter.removeAllListeners(''onOneOfManyCodeResult');
eventEmitter.removeAllListeners(''onOneofManyCodeRemoved');
eventEmitter.removeAllListeners('''onOneofManyCodeSelected');
eventEmitter.removeAllListeners(''onScanBarcodeDetection');
eventEmitter.removeAllListeners(''onScanResultFailure');
eventEmitter.removeAllListeners(''onScanResultSuccess');
};
});
function onBatchScanResultSuccess(data: any) {
}
function onOneOfManyCodeResult(data: any) {
}
function onOneofManyCodeRemoved(data: any) {
}
function onOneofManyCodeSelected(data: any) {
}
function onScanBarcodeDetection(data: any) {
}
function onScanResultFailure(data: any) {
}
function onScanResultSuccess(data: any) {
}
Based on the user selection configuration It will return ScanflowReader object.
- onScanResultSuccess returns the Barcode result object for QR Code, barcode and Any mode.
- onScanResultFailure returns the Reason when Scanner failed to Scan.
- onBatchScanResultSuccess returns the Batch Scan Barcode Result.
- onOneOfManyCodeResult returns all barcode results in array Selected One of many codes.
- onOneofManyCodeSelected returns Currently selected Result in ONE_OF_MANY Mode.
- onOneofManyCodeRemoved returns Removed selected Result in ONE_OF_MANY Mode.
Text Scanner
Importing the Text component
import {DatacaptureText} from 'react-native-datacapture-Text';
Use the Text Component in your app
<DatacaptureText
LicenseKey={"YOUR SCANFLOW LICENSE KEY MUST BE ENTER HERE"}
isBeepSound={true} //enable or disable play beep sound
isScanType={“ANY}
isVibrartion={true} //enable or disable vibrate
isAutoFlashlight={true} //enable or disable auto flashlight mode
isAutoExposure={true}
isContinuousScan={true} //by default true for continuous scan
isAutoZoom={false} //enable or disable auto zoom mode
/>
Setup Text Scanner Configuration
The following props are explained in detail:
licenseKey (type: String):
The license key prop is a string value that represents the unique identifier or authorization code required to activate and authenticate the scanflow.
isScanType (type: predefined String)
The Text Scanner has six different features
Type
Description
CONTAINER_VERTICAL
It allows you to read vertical text from Containers. We have our own enhancement pipeline to read text from Containers will be performed
CONTAINER_HORIZONTAL
It allows you to read horizontal text from Containers. We have our own enhancement pipeline to read text from Containers will be performed
Text Result Listener:
onScanResultSuccess returns the TextScanResult result object for Tyre and Container onScanResultFailure returns the Reason when Scanner failed to Scan
useEffect(() => {
eventEmitter.addListener('onBatchScanResult', onBatchScanResultSuccess);
eventEmitter.addListener('onOneOfManyCodeResult', onOneOfManyCodeResult);
eventEmitter.addListener(''onOneofManyCodeRemoved', onOneofManyCodeRemoved);
eventEmitter.addListener('onOneofManyCodeSelected', onOneofManyCodeSelected);
eventEmitter.addListener('onScanBarcodeDetection', onScanBarcodeDetection);
eventEmitter.addListener(''onScanResultFailure', onScanResultFailure);
eventEmitter.addListener('onScanResultSuccess', onScanResultSuccess);
return () => {
eventEmitter.removeAllListeners(''onBatchScanResult');
eventEmitter.removeAllListeners(''onOneOfManyCodeResult');
eventEmitter.removeAllListeners(''onOneofManyCodeRemoved');
eventEmitter.removeAllListeners('''onOneofManyCodeSelected');
eventEmitter.removeAllListeners(''onScanBarcodeDetection');
eventEmitter.removeAllListeners(''onScanResultFailure');
eventEmitter.removeAllListeners(''onScanResultSuccess');
};
});
function onBatchScanResultSuccess(data: any) {
}
function onOneOfManyCodeResult(data: any) {
}
function onOneofManyCodeRemoved(data: any) {
}
function onOneofManyCodeSelected(data: any) {
}
function onScanBarcodeDetection(data: any) {
}
function onScanResultFailure(data: any) {
}
function onScanResultSuccess(data: any) {
}
Welcome to Scanflow SDK
Scanflow is an AI scanner on smart devices for data capture & workflow automation Kit that captures multiple data from Barcode, QR Code, Text, IDs, Safety codes
Key features:
Barcode scanning: Scanflow enables developers to quickly implement barcode / QR Code scanning into their applications running on different platforms.
Batch scanning: Implement Scanflow batch scanning in any smart device & capture any set of multiple code barcodes with a single scan. This highly intelligent data capture helps in transforming workflow operations with high speed and accuracy.
Benefits:
- Boost your customer retention rates: Providing a seamless customer experience to your clients using a user-friendly mobile onboarding solution. This will allow you to reach out to clients through their preferred channel while still providing accurate results with few user-interface steps.
- Put yourself above the competition: Reduce the amount of work required from the end user to collect and transmit data during the onboarding process while still ensuring accurate back-end integration that processes the necessary data.
- Optimize your development resources: Integrate a ready-made, complete mobile capture solution without difficulty into your mobile application.
- Optimize sssyour development resources: Integrate a ready-made, complete mobile capture solution without difficulty into your mobile application.
1. Generating a Scanflow License Key
Generating a Scanflow License - IOS
- You need a license key to utilize the Scanflow SDK in your application.
- You must determine the applicationId of your Android app to generate a license key for your application.
- An applicationId is used to generate each license. If your applicationId changes, a new license key must be generated. Please be aware that you cannot use your license key with other programmers.
In your signing and capabilities or info.plist file
The application bundle id for your app may be found in the info.plist file or in signing & capabilities
Purchase a License Key
- Create a free test account at https://console.scanflow.ai/ if you do not already have one if you want to use Scanflow.
- Visit https://console.scanflow.ai/login to access your account.
- Click "Create native SDK licensing key" and input the bundle ID for your project if you don't yet have a license key for your app.
- The license key should be copied.
- The license key should be copied.
React Native Platforms
1. Getting Started
The React Native section of this documentation provides a comprehensive overview of the key components of Scanflow AI barcode. It serves as a guided tour, equipping you with the necessary knowledge to construct your mobile application and lays the foundation for exploring more advanced functionalities of barcode scanning. This section will cover the essential aspects, ensuring you have a solid understanding the more advanced features of Scanflow's barcode scanning capabilities.
Prerequisites
To be able to use the Scanflow SDK (Software Development Kit), the following requirements must be met:
- Supported OS (Operating System): iOS 13.0 or higher.
- Development Environment: XCode 13.0+ and swift version = "5.0+"
- A valid Scanflow Data Capture SDK license key. You can sign up for a free test account at https://console.scanflow.ai/
Add the SDK
To integrate the Scanflow AI Capture SDK into your project and develop an application, follow the steps below:
Depedency Library
The Scanflow Core library comprises core utilities specifically designed for barcode scanning purposes. These utilities provide essential functionality and tools necessary for seamless barcode scanning within your application. By incorporating the Scanflow library into your project, you can leverage these core utilities to enhance your barcode scanning capabilities and streamline related processes. Start by installing the following command:
npm i react-native-datacapture-core
If you already have the required libraries installed and they are up to date, there is no need to execute the above command for installation.
Library Installation
- Start by installing the Scanflow AI Capture SDK library in your project. You can do this by running the following command:
npm i react-native-datacapture-barcode
npm I react-native-datacapture-text
This will install the required dependencies
Permission
IOS - Info.Plist
To acquire data on the current condition of the library, your application needs an Internet connection and Camera Permission for Scanflow AI Scanner. So, confirm you have given app privacy camera usage description in your info.plist
Key : Privacy - Camera Usage Description
Value : $(PRODUCT_NAME) camera use
Key : Privacy - Location Always and When In Use Usage Description
Value : $(PRODUCT_NAME) location access
This will grant the required camera permission to the application, enabling the Scanflow AI Barcode Scanner to capture barcode data effectively.
Explore our Sample & Demo App
Look at our Sample & Demo App to get a hands-on experience of the capabilities offered by our solution. This app serves as an excellent resource to understand the functionalities and features available with our technology. You can explore real-life use cases, interact with the app, and witness the potential of our solution in action.
To run a sample module, follow these steps:
- Download or clone the sample module code from the provided source. You can typically find this on a GitHub repository or a dedicated project website.
- Open your preferred development environment or command-line interface. Navigate to the directory where the sample module code is located.
- Install any additional dependencies or packages required by the sample module. This can usually be done using a package manager like npm. Use the following command:
npm install
cd ios
pod install
npm run ios
By following these steps, you can run the sample module and explore its functionalities.
We have created a variety of sample applications to showcase the functionalities of the Scanflow AI Barcode SDK. The basic samples serve as an excellent starting point, providing a simple and straightforward implementation that allows you to get up and running quickly. These samples are designed to help you understand the fundamental usage of the SDK and its core features.
Whether you are looking for a quick start or want to dive deeper into the advanced settings, our sample applications have you covered. They provide a comprehensive range of examples to support your learning and implementation process with the Scanflow Data Capture SDK.
Here is a list of the samples we currently have for Android:
- Barcode Scan Samples
- Barcode Batch Scan Samples
- Multiple Barcode Selection Samples
- ID Card Capture Samples
- Text Data Capture Samples
You must follow a few steps before you can run a sample app:
- Create a free test account at https://console.scanflow.ai/ if you do not already have one if you want to use Scanflow.
- Visit https://console.scanflow.ai/login to access your account.
- Click "Create native SDK licensing key" and input the bundle ID for your project if you don't yet have a license key for your app.
- The license key should be copied. Once you have it, include the license key in the example
Once you have it, include the license key in the example:
<DatacaptureBarcode LicenseKey = "{"YOUR SCANFLOW LICENSE KEY MUST BE ENTER HERE"}"/>
Each sample project Activity class has the SCANFLOW_LICENSE_KEY variables.
3. Release Guide
4. API Documentation
Barcode Scanner
Basic usage examples of the library
Importing the Barcode component
import {DatacaptureBarcode} from 'react-native-datacapture-barcode';
Use the Barcode Component in your app
<DatacaptureBarcode
LicenseKey={"YOUR SCANFLOW LICENSE KEY MUST BE ENTER HERE"}
isBeepSound={true} //enable or disable play beep sound
isScanType={“ANY}
isVibrartion={true} //enable or disable vibrate
isAutoFlashlight={true} //enable or disable auto flashlight mode
isAutoExposure={true}
isContinuousScan={true} //by default true for continuous scan
isAutoZoom={false} //enable or disable auto zoom mode
setCameraResolution={“FILL_HD_1080P”}
/>
Setup Barcode Scanner Configuration
The following props are explained in detail:
licenseKey (type: String):
The license key prop is a string value that represents the unique identifier or authorization code required to activate and authenticate the scanflow.
isScanType (type: predefined String)
The Barcode Scanner has six different features
Type
Description
QR CODE
It allows only 2D-type barcodes to be scanned, other types of codes will be ignored.
BARCODE
It allows only 1D type barcode to be scanned, other types of codes will be ignored.
ANY
It allows both 1D & 2D type barcode scanned.
BATCH_INVENTORY
It enables batch mode. still user reset I will save all types of 1D & 2D codes scanned by user.
ONE_OF_MANY
It enables one of many modes. Detected Code will be highlighted in overlay view user can be able to select by clicking on highlighted 1D/2D codes.
PIVOT_VIEW
Pivot view is also known for Single Hand use where among multiple 1D/2D codes on screen centre of the screen will be scanned and result will be shown.
isBeepSound (type:boolen)
- The isBeepSound prop is a boolean value that controls whether or not a beep sound is played in a specific scenario.
- When set to true, the component or feature associated with the isBeepSound prop will generate an audible beep sound to provide feedback or indicate a successful operation.
- On the other hand, when set to false, the beep sound will be disabled.
- By toggling the isBeepSound prop based on your application's specific requirements, you can customize the presence or absence of the beep sound, aligning it with your desired user experience and interaction design.
IsVibrartion (type:boolen):
- The `isVibration` prop is a boolean value that controls whether or not vibration feedback is enabled in a specific scenario.
- When set to `true`, the component or feature associated with the `isVibration` prop will trigger device vibration to provide haptic feedback or indicate a successful operation.
- On the other hand, when set to `false`, the vibration feedback will be disabled.
- By toggling the `isVibration` prop based on your application's specific needs, you can customize the presence or absence of vibration feedback, aligning it with your desired user experience and interaction design.
IsAutoFlashLight (type:boolen)
- The isAutoFlashlight prop is a boolean value that determines whether the flashlight on the device is automatically enabled or disabled in a while scanning.
IsAutoExposure (type:boolen)
- The isAutoExposure prop is a boolean value that controls whether the exposure of a camera or image capture feature is automatically adjusted based on lighting conditions (true) or manually adjusted (false).
IsContinuousScan (type:boolen)
- The isContinuousScan prop is a boolean value that determines whether the scanning process continues automatically after detecting a barcode (true) or stops after scanning one barcode (false).
IsAutoZoom (type:boolen)
- The isAutoZoom prop is a boolean value that determines whether the zoom level of a camera or image capture feature is automatically adjusted based on certain conditions (true) or requires manual adjustment (false).
SetCameraResolution (type:predefinedString)
Type
Description
SD_480P
Standard Definition (480p) is a video resolution option that offers moderate image quality and lower file sizes suitable for playback on various devices and streaming platforms.
HD_720P
High Definition (720p) is a video resolution option that provides enhanced image quality with sharper details, making it ideal for high-quality video playback on HD-compatible screens.
FULL_HD_1080P
Full HD (1080p) is a video resolution option that delivers excellent image quality with crisp and detailed visuals, suitable for larger screens and immersive viewing experiences.
UHD_4K
Ultra HD (4K) is a video resolution option that offers incredibly high image quality with exceptional clarity and vividness, providing an immersive and lifelike viewing experience on compatible screens.
Barcode Result Listener:
useEffect(() => {
eventEmitter.addListener('onBatchScanResult', onBatchScanResultSuccess);
eventEmitter.addListener('onOneOfManyCodeResult', onOneOfManyCodeResult);
eventEmitter.addListener(''onOneofManyCodeRemoved', onOneofManyCodeRemoved);
eventEmitter.addListener('onOneofManyCodeSelected', onOneofManyCodeSelected);
eventEmitter.addListener('onScanBarcodeDetection', onScanBarcodeDetection);
eventEmitter.addListener(''onScanResultFailure', onScanResultFailure);
eventEmitter.addListener('onScanResultSuccess', onScanResultSuccess);
return () => {
eventEmitter.removeAllListeners(''onBatchScanResult');
eventEmitter.removeAllListeners(''onOneOfManyCodeResult');
eventEmitter.removeAllListeners(''onOneofManyCodeRemoved');
eventEmitter.removeAllListeners('''onOneofManyCodeSelected');
eventEmitter.removeAllListeners(''onScanBarcodeDetection');
eventEmitter.removeAllListeners(''onScanResultFailure');
eventEmitter.removeAllListeners(''onScanResultSuccess');
};
});
function onBatchScanResultSuccess(data: any) {
}
function onOneOfManyCodeResult(data: any) {
}
function onOneofManyCodeRemoved(data: any) {
}
function onOneofManyCodeSelected(data: any) {
}
function onScanBarcodeDetection(data: any) {
}
function onScanResultFailure(data: any) {
}
function onScanResultSuccess(data: any) {
}
Based on the user selection configuration It will return ScanflowReader object.
- onScanResultSuccess returns the Barcode result object for QR Code, barcode and Any mode.
- onScanResultFailure returns the Reason when Scanner failed to Scan.
- onBatchScanResultSuccess returns the Batch Scan Barcode Result.
- onOneOfManyCodeResult returns all barcode results in array Selected One of many codes.
- onOneofManyCodeSelected returns Currently selected Result in ONE_OF_MANY Mode.
- onOneofManyCodeRemoved returns Removed selected Result in ONE_OF_MANY Mode.
- onOneofManyCodeRemoved returns Removed selected Result in ONE_OF_MANY Mode.
Text Scanner
Importing the Text component
import {DatacaptureText} from 'react-native-datacapture-Text';
Use the Text Component in your app
<DatacaptureText
LicenseKey={"YOUR SCANFLOW LICENSE KEY MUST BE ENTER HERE"}
isBeepSound={true} //enable or disable play beep sound
isScanType={“ANY}
isVibrartion={true} //enable or disable vibrate
isAutoFlashlight={true} //enable or disable auto flashlight mode
isAutoExposure={true}
isContinuousScan={true} //by default true for continuous scan
isAutoZoom={false} //enable or disable auto zoom mode
/>
Setup Text Scanner Configuration
The following props are explained in detail:
licenseKey (type: String):
The license key prop is a string value that represents the unique identifier or authorization code required to activate and authenticate the scanflow.
isScanType (type: predefined String)
The Text Scanner has six different features
Type
Description
CONTAINER_VERTICAL
It allows you to read vertical text from Containers. We have our own enhancement pipeline to read text from Containers will be performed
CONTAINER_HORIZONTAL
It allows you to read horizontal text from Containers. We have our own enhancement pipeline to read text from Containers will be performed
Text Result Listener:
onScanResultSuccess returns the TextScanResult result object for Tyre and Container onScanResultFailure returns the Reason when Scanner failed to Scan
useEffect(() => {
eventEmitter.addListener('onBatchScanResult', onBatchScanResultSuccess);
eventEmitter.addListener('onOneOfManyCodeResult', onOneOfManyCodeResult);
eventEmitter.addListener(''onOneofManyCodeRemoved', onOneofManyCodeRemoved);
eventEmitter.addListener('onOneofManyCodeSelected', onOneofManyCodeSelected);
eventEmitter.addListener('onScanBarcodeDetection', onScanBarcodeDetection);
eventEmitter.addListener(''onScanResultFailure', onScanResultFailure);
eventEmitter.addListener('onScanResultSuccess', onScanResultSuccess);
return () => {
eventEmitter.removeAllListeners(''onBatchScanResult');
eventEmitter.removeAllListeners(''onOneOfManyCodeResult');
eventEmitter.removeAllListeners(''onOneofManyCodeRemoved');
eventEmitter.removeAllListeners('''onOneofManyCodeSelected');
eventEmitter.removeAllListeners(''onScanBarcodeDetection');
eventEmitter.removeAllListeners(''onScanResultFailure');
eventEmitter.removeAllListeners(''onScanResultSuccess');
};
});
function onBatchScanResultSuccess(data: any) {
}
function onOneOfManyCodeResult(data: any) {
}
function onOneofManyCodeRemoved(data: any) {
}
function onOneofManyCodeSelected(data: any) {
}
function onScanBarcodeDetection(data: any) {
}
function onScanResultFailure(data: any) {
}
function onScanResultSuccess(data: any) {
}
Scanflow_websdk_demo
This library is used to support the developers in order to perform the scanning of the ID's,QR Codes and get the data to be displayed on their website with ease
Installation:
To install the Scanflow WebSDK package into your project use the below installation command from your command prompt.The npm package is available globally on the website https://www.npmjs.com/package/scanflow_websdk.
Installation Command - npm install scanflow_websdk (Latest Version 1.1.13)
Demo Code Repository - https://github.com/Scanflow-ai/scanflow-websdk-samples
Prerequisite:
Hardware Requirements:
Recommended Camera - Full HD (1080p) or above resolution Web Camera for capturing the ID Card to get accurate results.
Recommended CPU - 2.0GHz or more
Prerequisite:
Recommended Browsers:
Chrome Version - 106.0.5249.119 and +
Firefox Version - 104.0.2 and +
Opera Version - 91.0.4516.20 and +
Safari Version - 15.6 and +
Edge - 106.0.1370.34 and +
Other Requirements:
Scanflow License Key - It is an important key to make the package work and get the results of the ID Card data.
Scanning performance
- The performance of the scanner depends on the device and camera being used. Nonetheless for optimal speed/quality, please keep in mind the following guidelines/tips:
- Depending on your use case, it might be worth to enable Full HD or Ultra HD video quality, resulting in slower frame processing times but higher resolution recognition. The accuracy of output will be very high.
- The ID card holding distance can be < a feet to get the better accuracy.
- The first Single Image Mode scan might be slower than subsequent ones depending on the network condition as the Scanflow Data Capture Library has to first verify the license key online before proceeding to capture data through inbuilt camera.
Usage
Configuration
- For optimal performance, this configuration/initialization
should be done as soon as possible in your application (even before scanning is actually required) to ensure needed components are preloaded and initialized ahead of time.
License Key : License Key which is generated by scanflow support team.
Domain Name : Users domain name while generating the license key.
- The configuration function needs to be initialized as follows and it returns a promise.
Example
import * as ScanflowSDK from 'scanflow_websdk_demo';
ScanflowSDK.configureSDK('USE YOUR LICENSE KEY HERE','YOUR
DOMAIN ID HERE') //important .then((res) => {
const rootElement = document.getElementById("camera_view");
const configuration = {
captureMode: "auto", //available modes 'auto','manual' };
const rootElement = document.getElementById("camera_view");
const captureObj = new ScanflowSDK.CaptureView( rootElement,configuration );
captureObj.getMediaDevices().then((res) => {
console.log(res) //returns all the available media devices }); })
.catch((err) => {
console.log(err); });
- The first required configuration option is a valid Scanflow license key - this is necessary for the library to work and is verified at configuration time. In order to get your license key, please contact scanflow support team.
- The “configureSDK” method needs to be imported from the package as given below and the user needs to use the valid license key in order to make the package work and get the scanned results of the ID Card (Aadhar Card). This step is an important part in the package, without the valid key the package will throw ‘Invalid License Key Error’
- On successful configuration of the package with the license key, then the user needs to create a class for the capture view as shown in the above snippet and pass the root element eg: DIV ELEMENT ID () with an optional configuration for facing mode and capture element width. It displays a camera view with a button to capture image to render view on the screen with the capture element.
- Note: This step is important and without a valid license key you can’t initialize the capture view.
- Once the card is fit with the frame and then the user needs to click the Start Capture button to capture the image and then SDK proccess it and once on successfull proccess the user needs to show the back side of the card which needs to be fit on the frame , then user can wait for proccessing by SDK and the resuslt is emitted by the emitter(getData).
- To listen to the emitter the user needs to create object for IDCapture Class then call addListener method which returns the emitter and then user needs to listen on getData emitter which returns data processed.
Example
const eventEmitter = new
ScanflowSDK.IDCapture().addListener();
eventEmitter.on("getData", (data) => {
//User Will get Processed Data
console.log(data) });
- If the card is misplaced or not clear or does not fit in the frame there will be an error emitted from the SDK which the developer can customize the error and populate to end user.
Example
const eventEmitter = new
ScanflowSDK.IDCapture().addListener();
eventEmitter.on("scan_error", (error) => {
// This event emits the data processed by SDK.
alert(error)});
- The mode of capture is by default is listed as auto and the user can change the mode to manual mode if the user wants to change the mode of capture. This can be done by following the snippet given below.
Example
const modes = new
ScanflowSDK.IDCapture().getcaptureModeData(); //Return available modes
const changeCaptureMode = (event) => {
const modeOfCapture = event.target.checked ? modes[0] : modes[1];
setCaptureMode(modeOfCapture);
setChecked(event.target.checked);
const constraints = {
deviceId: deviceId,};
const configuration = { licenseKey, captureMode: modeOfCapture,};
console.log(configuration);
const rootElement = document.getElementById("camera_view");
new ScanflowSDK.CaptureView(rootElement, configuration, constraints);};
- The user can also change the card type for capturing multiple ID Cards [Currently available cards are aadhar card and pan card] captures.By default the package will start with capturing aadhar card in the auto mode. This can be modified by following the snippet below.
Example
let cardType = '';
const cardsList = new ScanflowSDK.IDCapture().getCardTypes();
//Return available card types//needs to set cardsLIst in the
select or radio element to change the value
const changeCardType = (event) => { event.preventDefault();
cardType = event.target.value}
const configuration = { licenseKey, captureMode: "auto", cardType:cardType, };
const rootElement = document.getElementById("camera_view");
new ScanflowSDK.CaptureView(rootElement, configuration, constraints);}
- The result model for the scanned card will be available in the interfaces for all scanned cards data by the package. This data will be emitted by getData emitterCurrently available model for the below cards
Aadhar Card - Interface with Aadhar card Details
Pan Card - Interface with Pan Card Result Details
- Demo code will be available in the following repository for both angular integration and react integeration.
Demo Code Repository -
https://github.com/Scanflow-ai/scanflow-websdk-samples
Tech
- [Node v14.17.1](http://nodejs.org/) - [Axios]
- [Axios](https://www.npmjs.com/package/axios)
- [ESLint](https://www.npmjs.com/package/eslint) + [Prettier](https://www.npmjs.com/package/prettier)
Download SDK


Use this Barcode to download our mobile app and Experience scanflow
Privacy Policy
This privacy policy sets out how Scanflow uses and protects any information that you give Scanflow when you use this website. Scanflow is committed to ensuring that your privacy is protected. We shall ask you to provide certain information by which you can be identified when using this website, then you can be assured that it will only be used in accordance with this privacy statement.
Scanflow may change this policy from time to time by updating this page. You should check this page from time to time to ensure that you are happy with any changes.
What We Collect
We may collect the following information:
Name and job title
Contact information including email address
Demographic information such as postcode, preferences and interests
Other information relevant to customer surveys and/or offers
What we do with the information we gather
We require this information to understand your needs and provide you with a better service, and in particular for the following reasons:
Internal record keeping.
We may use the information to improve our products and services.
We may periodically send promotional emails about new products, special offers or other information which we think you may find interesting using the email address which you have provided.
From time to time, we may also use your information to contact you for market research purposes. We may contact you by email, phone, fax or mail.
We may use the information to customize the website according to your interests.
Security
We are committed to ensuring that your information is secure. In order to prevent unauthorized access or disclosure, we have put in place suitable physical, electronic and managerial procedures to safeguard and secure the information we collect online.
How we use cookies
A cookie is a small file which asks permission to be placed on your computer’s hard drive. Once you agree, the file is added and the cookie helps analyze web traffic or lets you know when you visit a particular site. Cookies allow web applications to respond to you as an individual. The web application can tailor its operations to your needs, likes and dislikes by gathering and remembering information about your preferences.
We use traffic log cookies to identify which pages are being used. This helps us analyze data about webpage traffic and improve our website in order to tailor it to customer needs. We only use this information for statistical analysis purposes and then the data is removed from the system.
Overall, cookies help us provide you with a better website, by enabling us to monitor which pages you find useful and which you do not. A cookie in no way gives us access to your computer or any information about you, other than the data you choose to share with us.
You can choose to accept or decline cookies. Most web browsers automatically accept cookies, but you can usually modify your browser setting to decline cookies if you prefer. This may prevent you from taking full advantage of the website.
Links to other websites
Our website may contain links to other websites of interest. However, once you have used these links to leave our site, you should note that we do not have any control over that other website. Therefore, we cannot be responsible for the protection and privacy of any information which you provide whilst visiting such sites and such sites are not governed by this privacy statement. You should exercise caution and look at the privacy statement applicable to the website in question.
Controlling your personal information
You may choose to restrict the collection or use of your personal information in the following ways:
Whenever you are asked to fill in a form on the website, look for the box that you can click to indicate that you do not want the information to be used by anybody for direct marketing purposes
If you have previously agreed to us using your personal information for direct marketing purposes, you may change your mind at any time by writing to or emailing us at info@scanflow.ai We will not sell, distribute or lease your personal information to third parties unless we have your permission or are required by law to do so. We may use your personal information to send you promotional information about third parties which we think you may find interesting if you tell us that you wish this to happen. If you believe that any information, we are holding out from you is incorrect or incomplete, please write to or email us as soon as possible at the above address. We will promptly correct any information found to be incorrect.